Insight Recon Docs: Scanner Setup and Portal Guide
Insight Recon docs
Scanner setup and portal guide
Install the scanner, run your first read-only scan, upload the results and set up the portal for your team. Everything's on this one page.
On this page
Getting started
The portal
- Dashboard and reports
- Remediation tracking
- Domains
- Silenced findings
- Team and permissions
- Sharing with customers
- Branding
- Plan and billing
- Scanner agents
- Email alerts
- Account settings
The scanner
Windows app
Command line
Portable
Linux
Security and help
01Getting started
How Insight Recon works
Insight Recon has two parts. The scanner runs on a machine inside your network, reads your Active Directory configuration and saves the results to an encrypted .irscan file. The portal turns that file into your findings and your report.
This guide covers both, for the people who run scans and anyone who reviews the results.
System requirements
Run the scanner from a Windows or Linux machine that can reach your domain. It reads your configuration and changes nothing. The installed scanner, its GUI and scheduled scans are Windows only. On Linux, the scanner is a portable command-line edition (see the Linux scanner).
| Requirement | What you need |
|---|---|
| Operating system | Any modern version of Windows, or a supported Linux distribution for the Linux edition on Enterprise, Auditor and MSSP. The installer needs x64 Windows. The Linux edition comes in x64 and ARM64. |
| Network access | A connection to at least one domain controller and the Active Directory services the scan reads, starting with LDAP. Most domain-joined machines already have it. Every port is listed on our security page. |
| Account | A standard domain user with read access. It doesn't need Domain Admin. We'd rather you didn't scan with it. |
| Internet access | Needed to sign in to the portal, download the scanner and upload results. The scan itself runs inside your network. You can upload the results file later from any machine that can reach the portal. |
| Local permissions | Rights to install and run software on the Windows machine you pick. The installer needs administrator rights. Turning on scheduled scans needs a one-time admin approval too, but the scan itself doesn't need local admin. The portable editions run without an install or admin rights. |
Domain membership isn't required.
The scanner can run from a machine that isn't joined to the domain, as long as it can reach the domain, resolve it in DNS and sign in with valid domain credentials.
Install the scanner
Open the portal
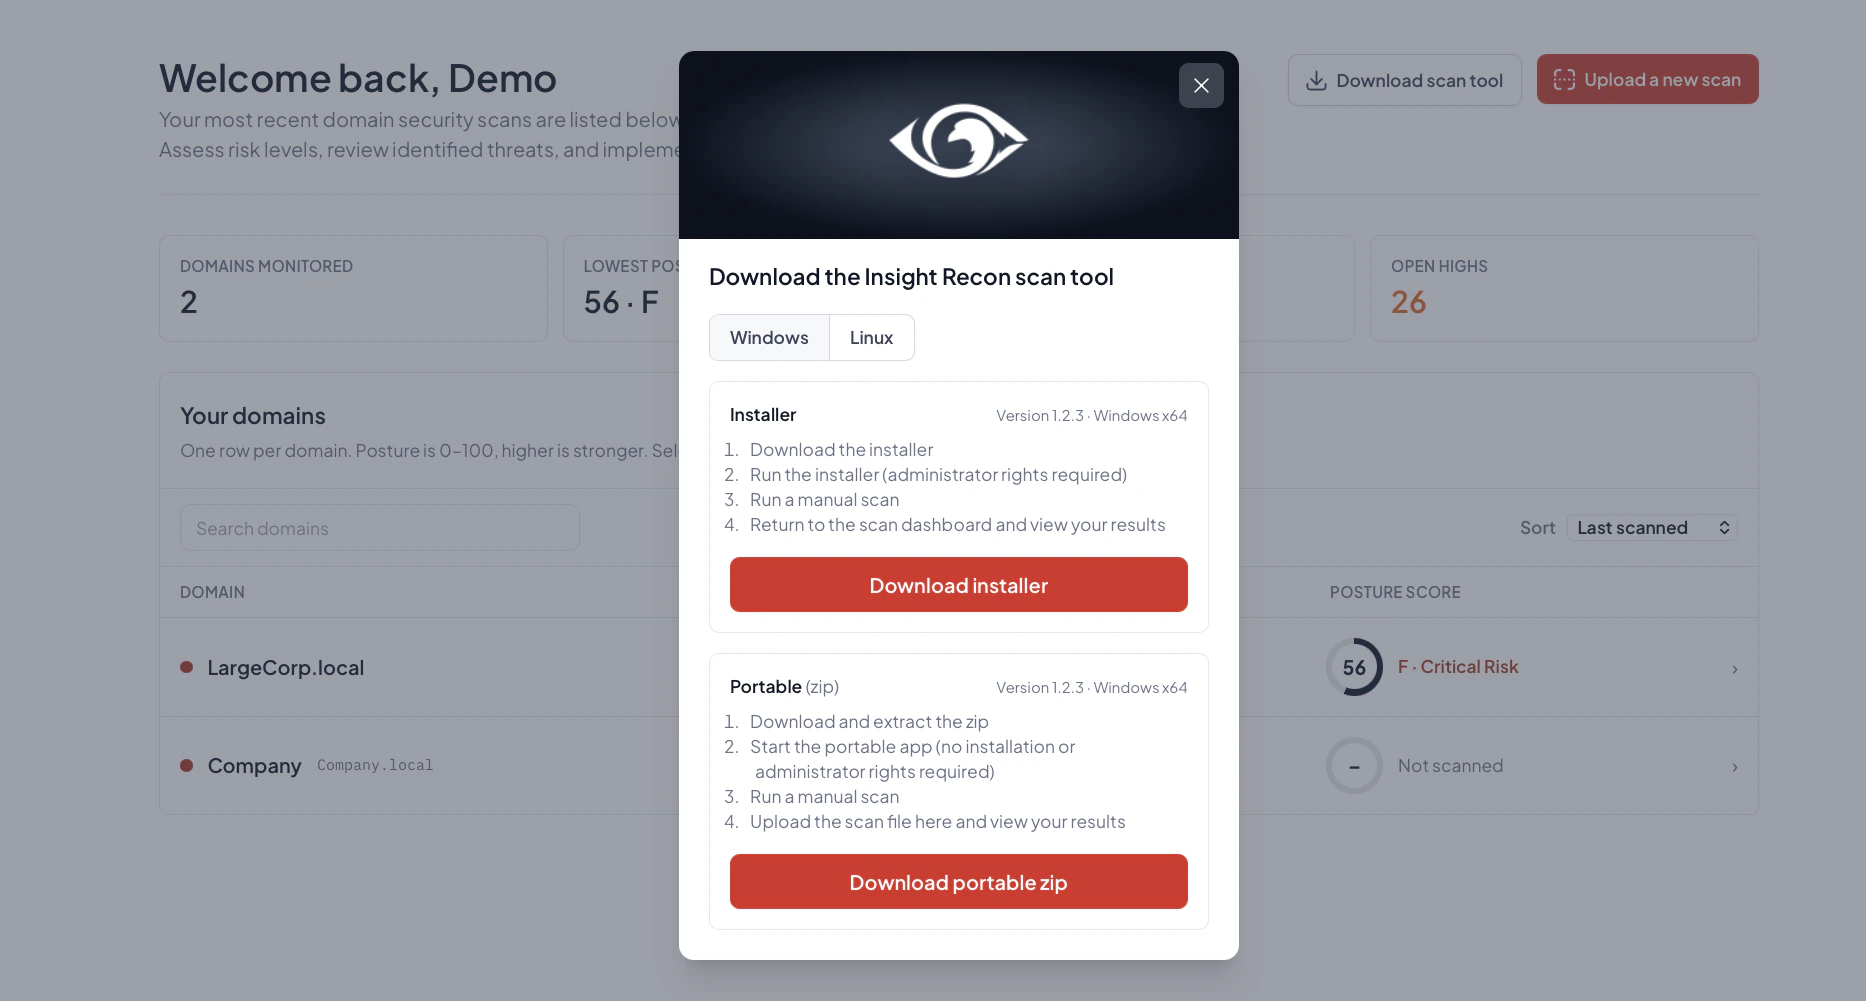
Sign in and select Download scan tool on the dashboard. You'll accept the end-user license agreement the first time you download, and again whenever it's updated.
Choose the edition
The download dialog has a Windows tab and a Linux tab, with a card for each edition and its download button. Windows offers the installer and a portable zip. Linux offers a portable tar.gz for x64 and ARM64.
Run the installer
Run it and follow the prompts. It needs administrator rights and installs to
C:\Program Files\InsightRecon\Scanner.Expect your endpoint protection to take a look
Security assessment tools can trip antivirus or EDR, because they read identity and configuration data. Confirm the file came from the portal and follow your usual software approval process.
The portable editions run without an install or admin rights. They don't sign in to the portal either. See the portable scanner for the Windows zip and the Linux scanner for the tar.gz.
Run your first scan
Run the scanner from a Windows machine with a solid connection to the domain you're scanning. Close anything you don't need before a big scan. On Linux, use the Linux scanner instead. These steps cover the Windows app.
Open the scanner
Start Insight Recon from the Start menu or the install folder.
Sign in to the domain
Enter the domain and the credentials the scanner asks for. Use an account that's approved for assessment work.
Start the scan
Check the target details, then start. Most domains finish in minutes. Large or complex ones take longer.
Find the results file
When it's done, the scanner saves the results to
C:\Users\<username>\Documents\InsightRecon\. The portable scanner saves them next to its executable. The file is asymmetrically encrypted, but it still holds security assessment data. Handle it with care.
An interrupted scan produces no output.
The scanner writes and uploads results only after collection finishes. If you close it or the machine sleeps, run the scan again. If only the upload fails, the file stays on disk and you can upload it by hand.
What the scanner does
- Reads Active Directory with read-only methods.
- Collects identity, privilege, policy, infrastructure, PKI and Group Policy settings, plus related security configuration.
- Uploads what it collects for analysis, which produces the findings, evidence, trends and fixes you see in the portal.
- Never creates, changes, deletes or disables directory objects.
Upload scan results
Results get to the portal one of two ways. Automatic upload is the normal path. Manual upload covers the times the scanner can't send the scan itself.
Recommended
Automatic upload
If you signed in through the scanner and the machine has internet access, the finished scan goes straight to your portal.
- No separate upload step.
- Results show up under the domain once processing finishes.
Fallback
Manual upload
For when the scanner is offline, you didn't sign in, the automatic upload failed, you used the portable scanner or you want to upload later.
- The results file is saved on the machine after the scan.
- Upload it from any machine with portal access.
- You get the same reports once it's processed.
Automatic upload
Automatic upload works when you're signed in to Insight Recon in the scanner and the machine can reach the portal.
Sign in through the scanner
Sign in with your Insight Recon portal account before you start the scan.
Run the scan
Run it as normal. There's nothing extra to do for the upload.
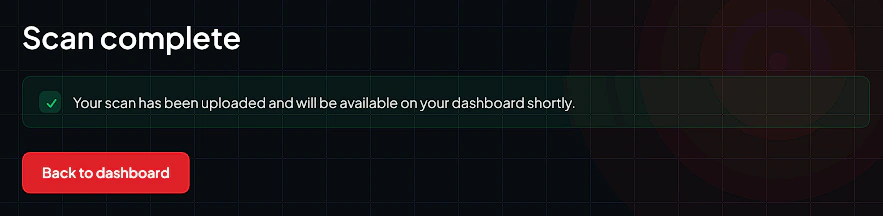
Wait for the confirmation
When the scan finishes, the scanner uploads the results and tells you whether it worked.
Open the results in the portal
Sign in to the portal and open the domain to see the new scan.
Manual upload
Upload by hand when there's no internet access, you didn't sign in through the scanner, the automatic upload hit an error, you used the portable scanner or you're submitting a results file you saved earlier.
Find the results file
After the scan, the
.irscanfile is saved toC:\Users\<username>\Documents\InsightRecon\. The portable and Linux scanners save it next to the executable instead.Select Upload a new scan
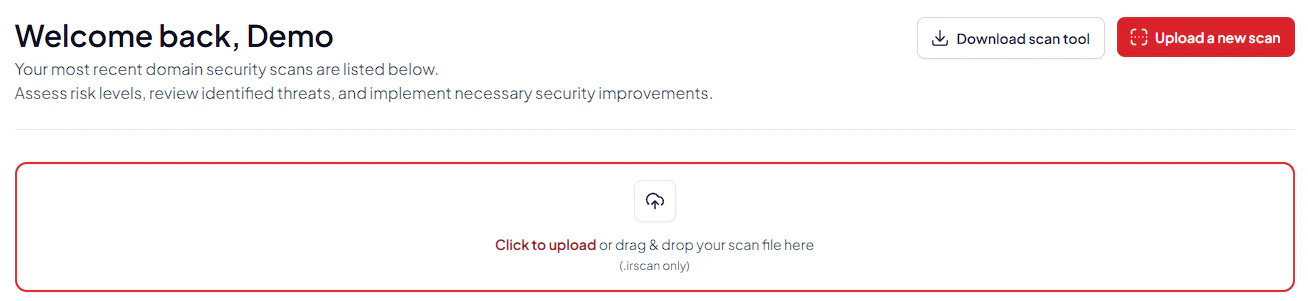
Sign in to the portal and select Upload a new scan on the dashboard.
Choose the file
Drag the file into the upload area or browse for it. The portal reads the domain from the file and matches it up. If the domain isn't on your account yet, it's added when your plan has room.
Wait for processing
Stay on the page until the upload finishes. Big scans keep processing in the background. The scan shows up in the domain's history and reports when it's done.
Track upload status
While an upload is in flight, the Home page shows an Uploads section with each file's status: Uploading, Queued for processing or Processing. If processing fails, the entry shows the error from the server and a Retry button.
Uploads count against your plan's scan capacity. Lots of uploads in a short time can get rate limited. A rejected upload tells you why. Wait and try again, or free up capacity first.
The upload doesn't finish
- Check that the machine has a stable internet connection.
- Make sure you're signed in to the right Insight Recon organization.
- Make sure the file came from a current scanner version and wasn't edited or only partly copied.
- Confirm your account can access the organization and domain you're uploading to.
- Try a manual upload. If it still fails, contact support.
02The portal
Dashboard and reports
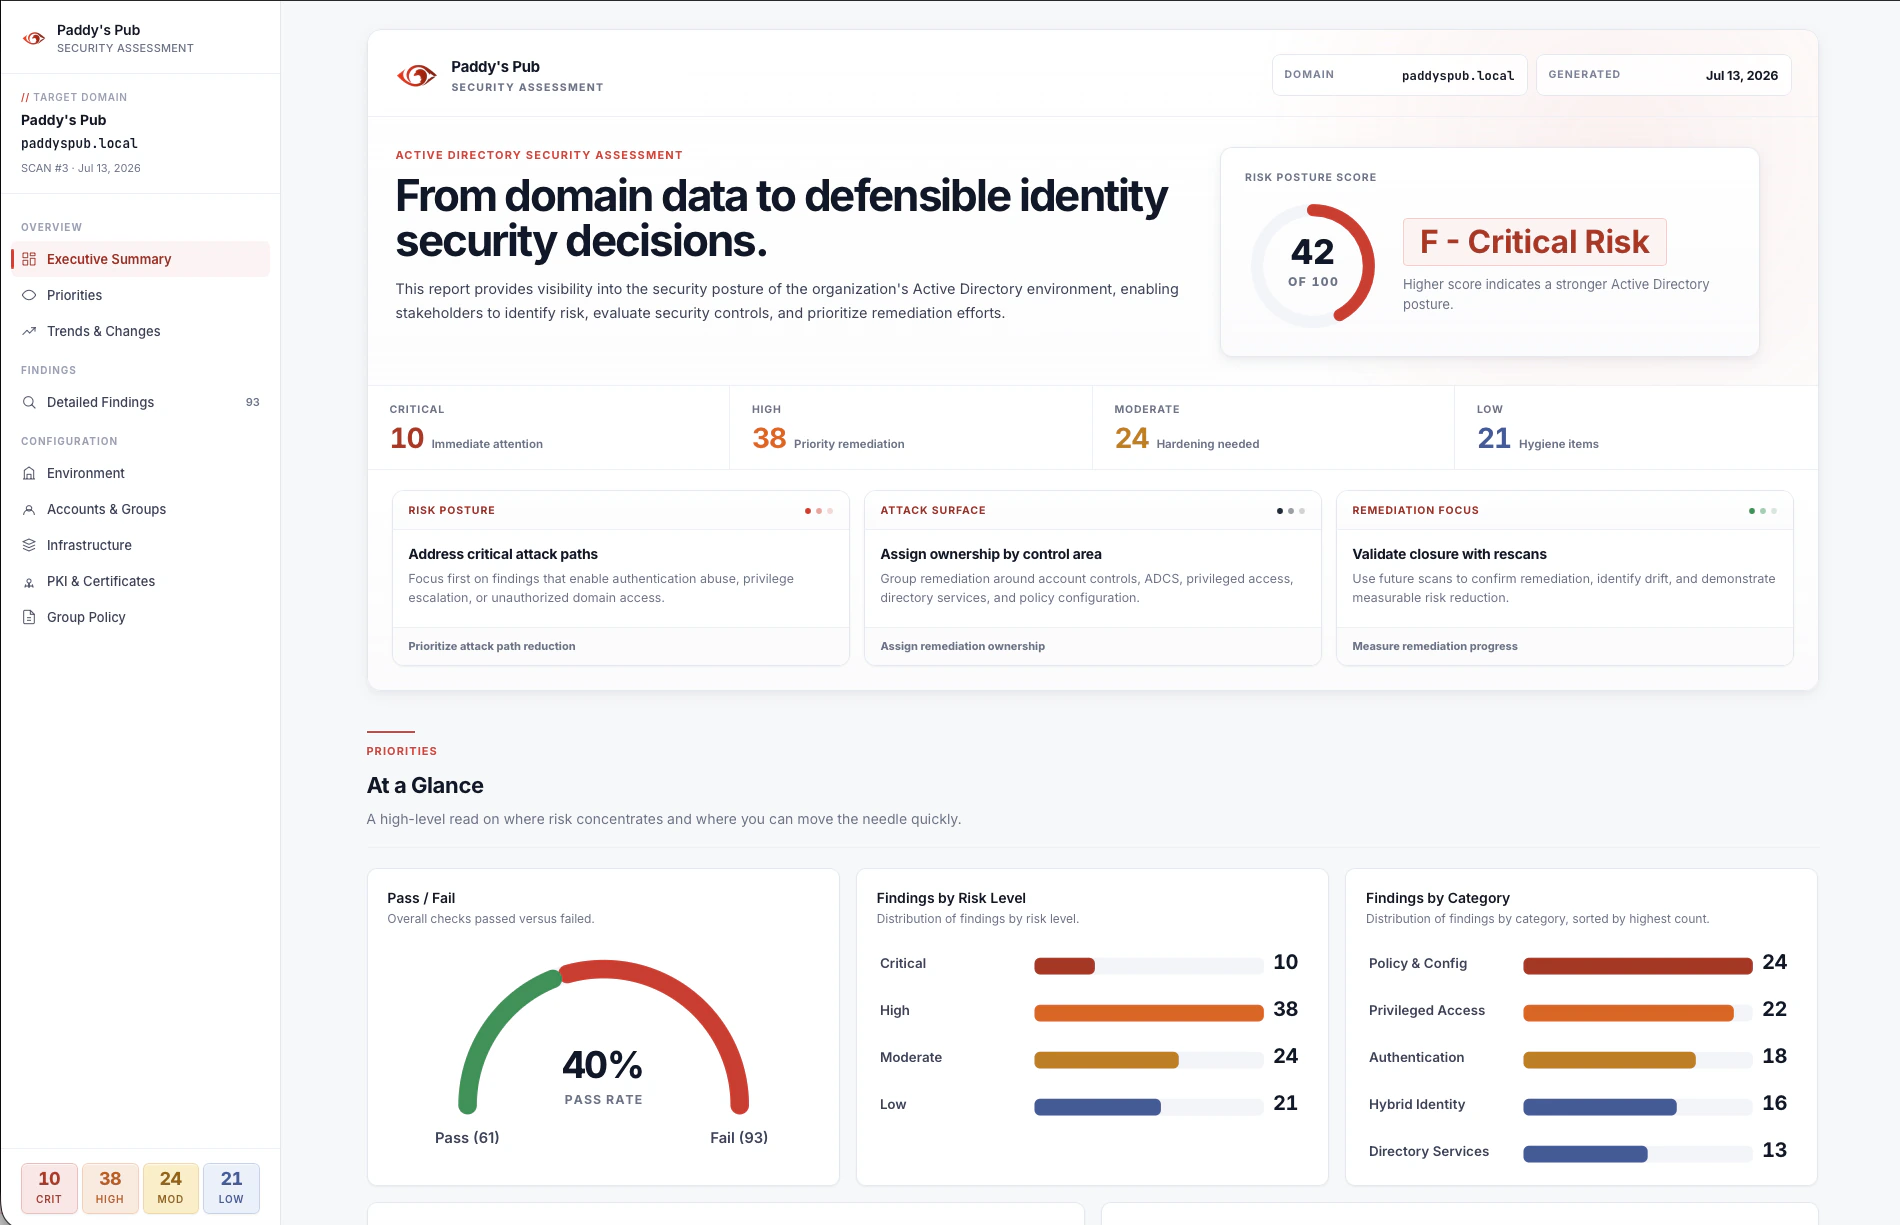
The portal has three levels. Home lists your domains. Pick one to see its scan history, then open a scan to review the findings and export a report.
Home page
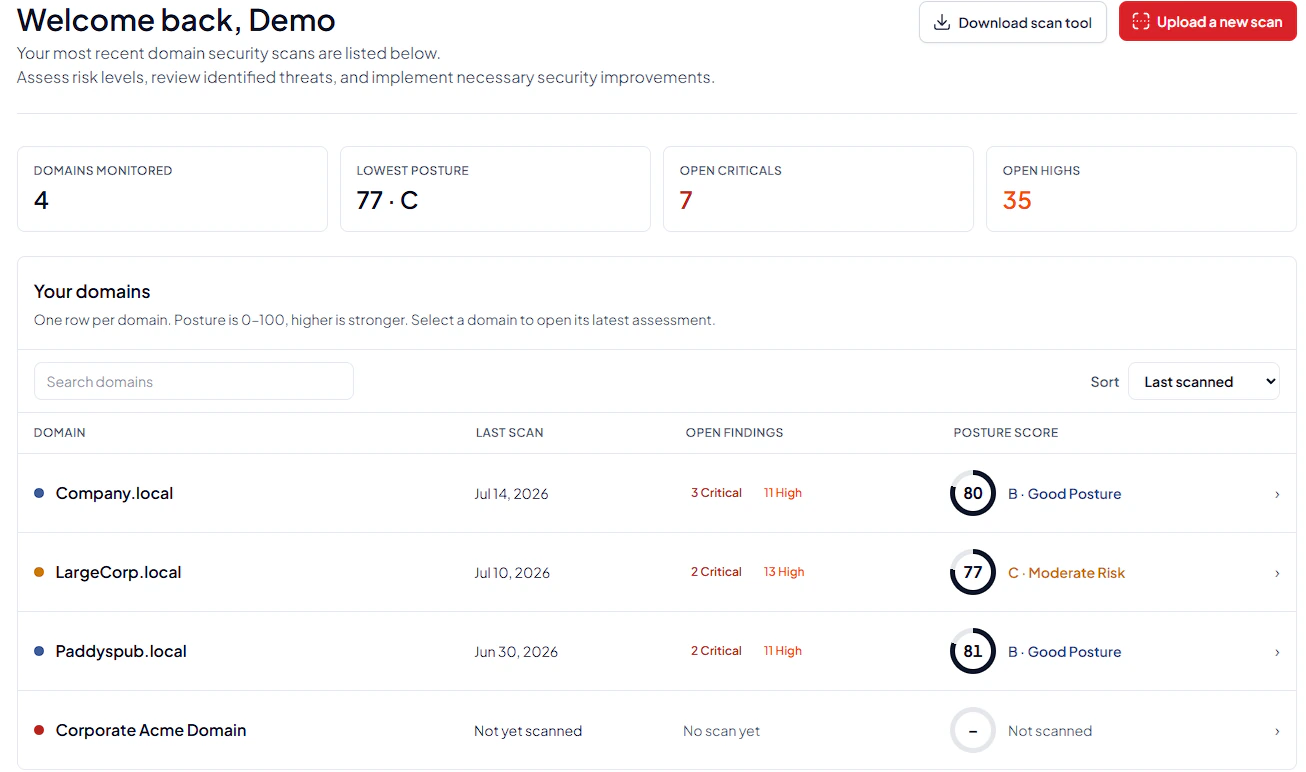
Home shows every domain you monitor in one place. Start common tasks from here and spot the domains that need attention.
- Download scan tool gets the current scanner.
- Upload a new scan submits a results file by hand.
- With more than one domain, summary stats show domains monitored, lowest posture, open criticals and open highs.
- Search and sort the domain list.
- Select a domain to open its latest posture and scan history. Accounts with one domain land on the domain view directly.
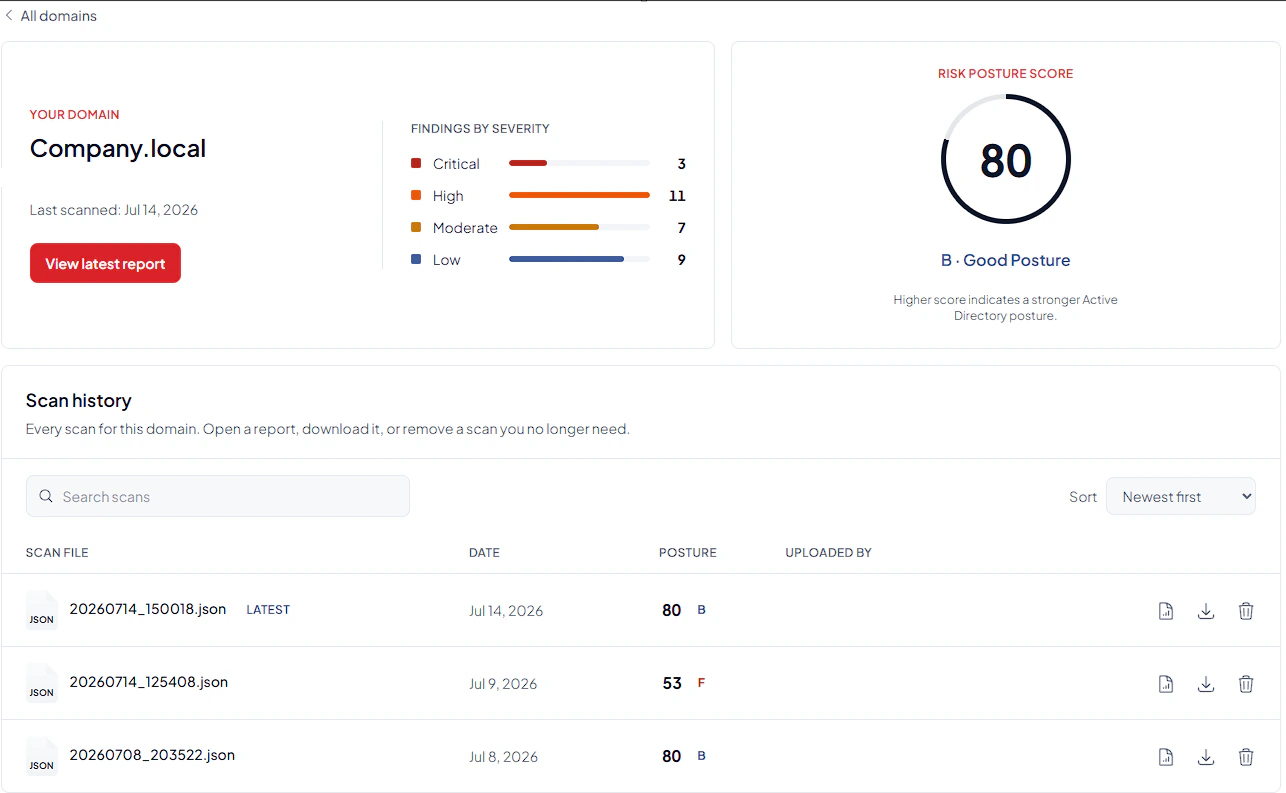
Domain view
Selecting a domain opens its domain view, with the latest posture for that domain and every scan you've run on it.
- See the latest scan date, findings by severity and the current risk posture score.
- Select View latest report to open the newest scan.
- Search and sort the scan history.
- Open any scan to review its results.
- Download the report for your records or offline use.
- Delete a scan you no longer need, if your role allows it.
Deleting a scan removes it from the portal.
Before you delete one, make sure you don't need it and save any report or scan file you want to keep.
Report view
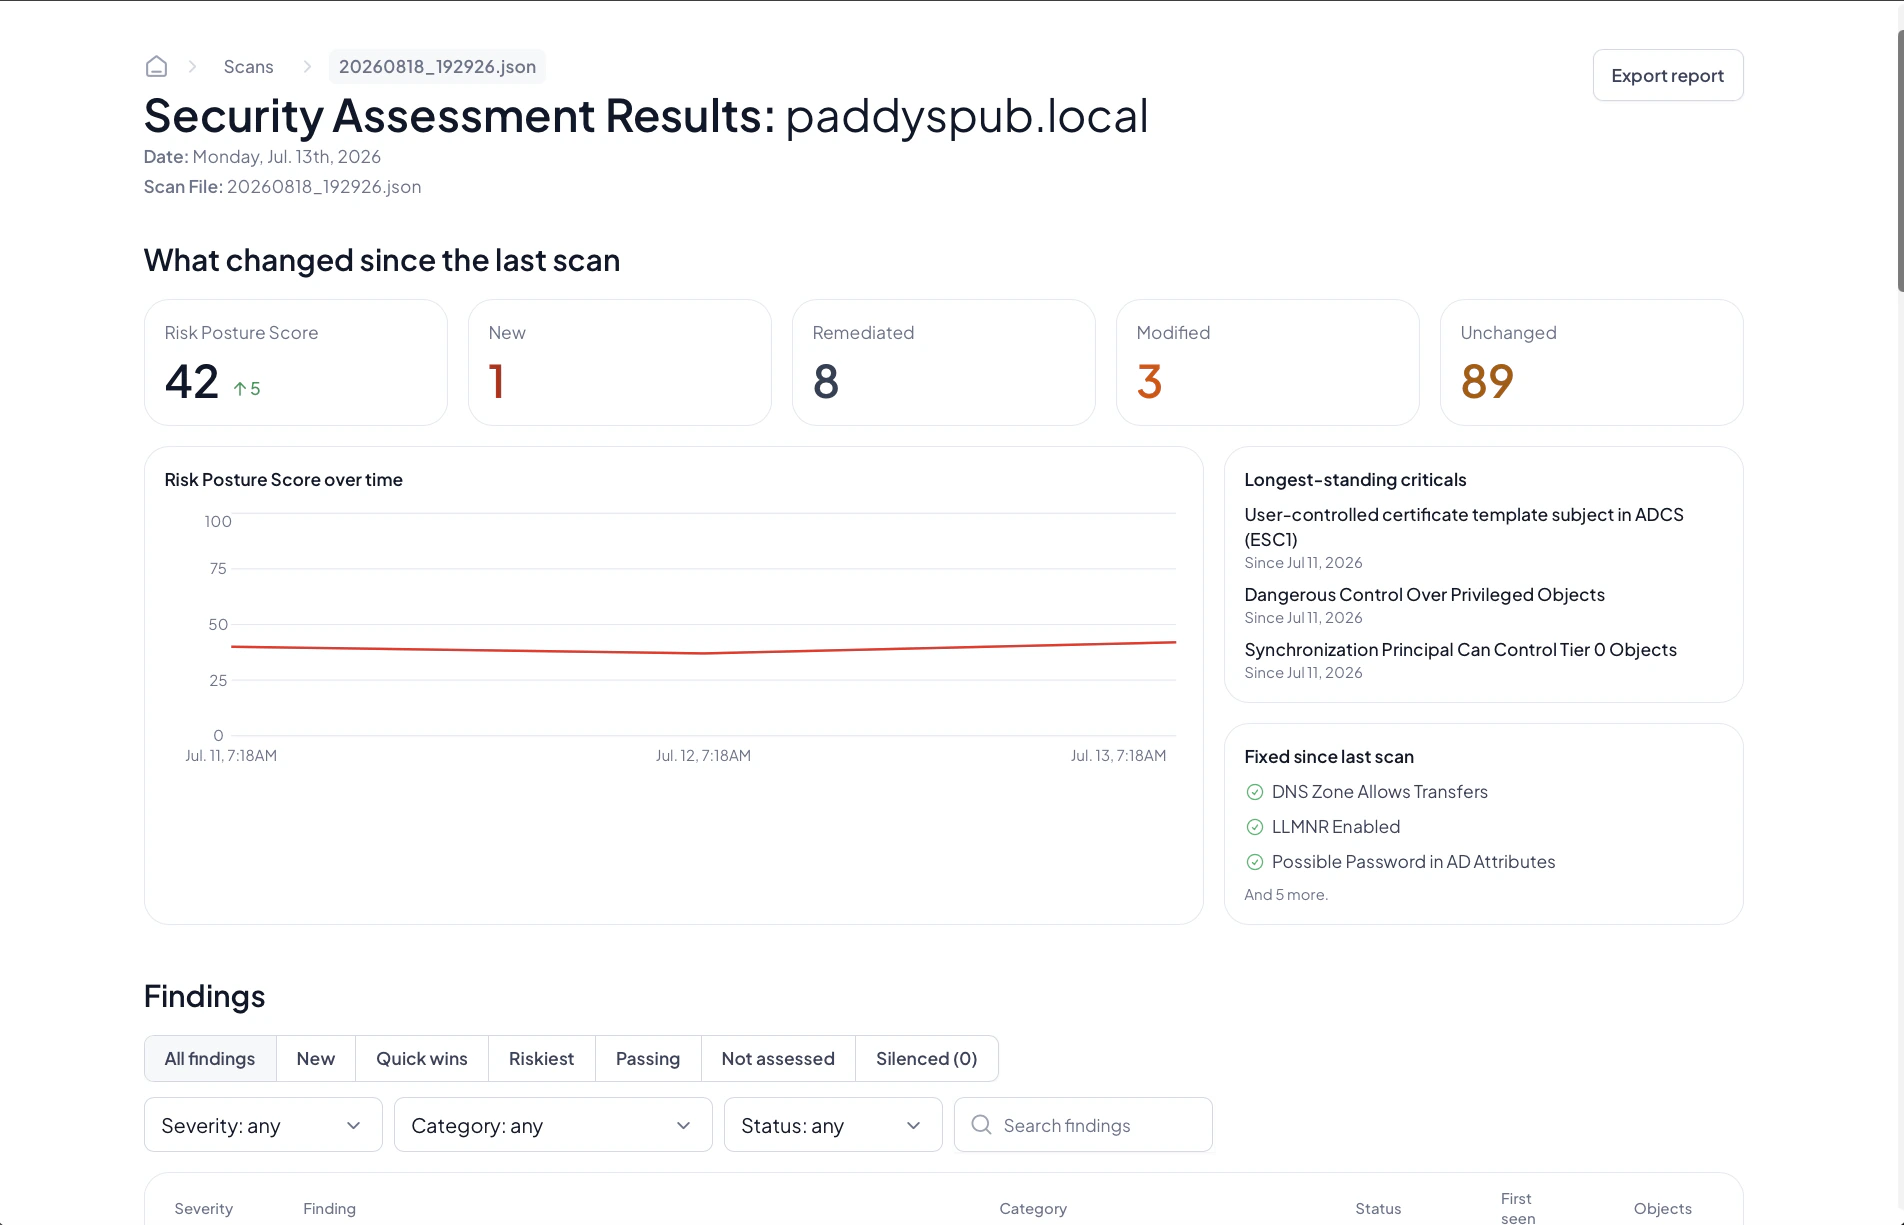
Opening a scan takes you to the report view, the interactive version of the assessment. Use it to dig into findings and plan fixes. It can include:
- The risk posture score and how it changed since the last scan.
- Counts of new, remediated, modified and unchanged findings.
- Posture trends and long-standing critical findings.
- Finding filters: tabs for All findings, New, Quick wins, Riskiest, Passing, Not assessed and Silenced, plus severity, category and status filters and a search box.
- Each finding's details, the affected objects, the fix, the attacker's view and more guidance.
- Environment details and inventory: accounts, computers, domain controllers, privileged groups, trusts, certificates and Group Policy.
Posture changes, trends and finding-change tracking need a plan with report history.
Finding states
Every check on a scan ends up in one of four states:
- Vulnerable: the problem was found and shows up as a finding.
- Passing: the check ran and didn't find the problem.
- Not assessed: the check couldn't be evaluated. Either the scanner couldn't collect the data it needs (a readiness check failed, for example) or the check needs a Windows scanner and the scan came from Linux.
- Silenced: an admin silenced the finding. It's left out of scoring and reporting.
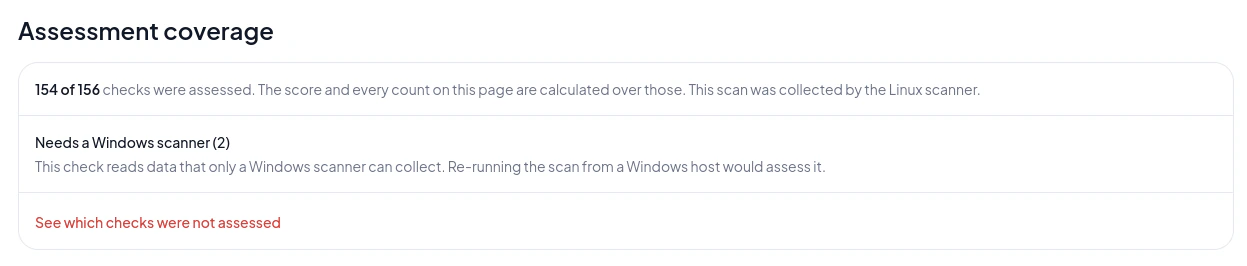
The Assessment coverage card on the scan page shows how much of the check library was assessed and links to the Not assessed tab. It also notes when the Linux scanner collected the scan.
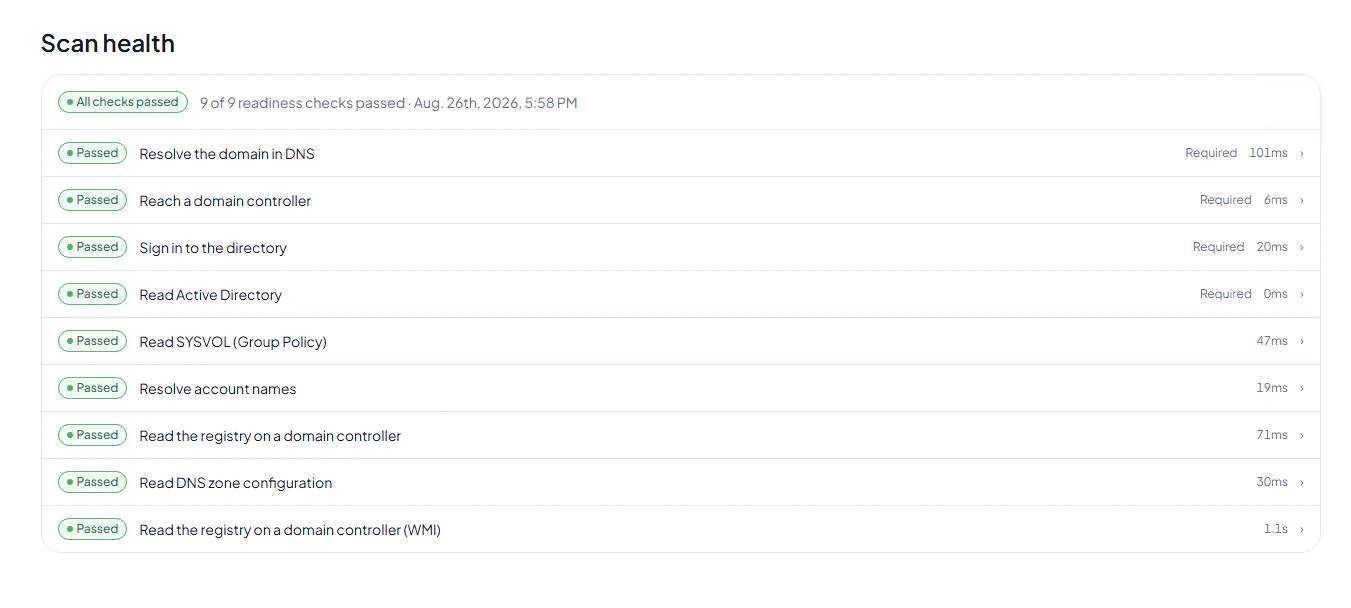
Scan health
The Scan health card shows the readiness checks from when the scan ran, with an overall verdict up top. Anything that failed or warned comes with a fix. Scans from current scanner versions have the card. Older uploads didn't record readiness data and don't show it.
Silence a finding
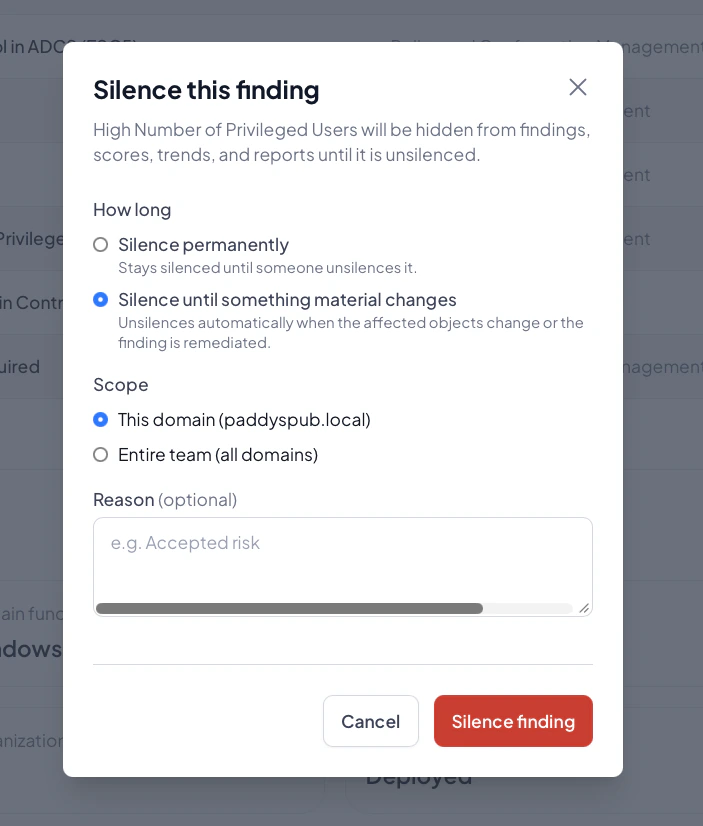
On plans with silencing, admins can silence a finding from its drawer. Silencing records it as accepted risk and takes it out of your score. A silence covers the current domain or the whole team. It lasts either permanently (until someone unsilences it) or until something material changes, which ends it automatically when the affected objects change or the finding is fixed.
- Silenced findings drop out of the posture score, trends, finding counts and reports.
- The Silenced tab in the findings explorer lists them for the current scan. A "Previously silenced" badge marks findings whose silence has ended.
- Manage every silence from Settings > Silenced Findings.
Account risk
On plans with account risk scoring, every account in the inventory gets a risk score and band. The account drawer breaks the score down and shows the privilege chain behind the account's access. The overview calls out your riskiest accounts.
Hybrid identity
On paid plans, scans from scanner version 1.1.14 or later include the Hybrid Identity category: checks on what your Microsoft Entra hybrid setup leaves in on-prem Active Directory. Older uploads don't show hybrid results.
Export a shareable report
Select Export report in the report view to make a report you can share with clients, leadership, technical teams and the people fixing things, even if they can't sign in to the portal. Silenced findings go in an appendix that keeps a record of the risk you accepted.
The portal and the exported report do different jobs.
Use the portal to dig in and manage scans over time. Use the exported report when you need to share results or hand them over formally.
Remediation tracking
Remediation tracking is on every paid plan. Give each finding an owner, a status and a due date. You can also paste in the ticket from your own system. Comments and every change stay with the finding.
The Remediator role lets engineers update the findings assigned to them without touching anything else. Remediators don't count toward Standard's user limit.
Statuses
A finding moves from Open to In progress to Awaiting verification, which means it's been marked fixed and is waiting for the next scan. When a scan confirms the fix, it's Verified fixed.
- If the next scan still finds it, it goes back to In progress and the activity log records why.
- If a scan finds it again after it was verified fixed, it reopens as Regressed and its SLA clock starts over from that scan.
SLA targets and due dates
SLA targets set the days allowed for each severity. Days count from the scan that first found the finding, or found it again. Due dates come from the SLA and you can change any date by hand.
| Severity | Default SLA |
|---|---|
| Critical | 15 days |
| High | 30 days |
| Moderate | 90 days |
| Low | 180 days |
The Remediation page shows how many fixes a scan verified on time and the median time to a verified fix.
Remediation queue
The queue is one list of everything still open across all your domains. It shows which findings are:
- Overdue or due this week.
- Unassigned.
- Awaiting verification.
- Found again by a scan.
Filter by owner or status, change up to 100 findings at once and export the list to CSV.
In your reports
Reports get a Remediation Status section with what's open, who owns it, what's overdue and what this scan confirmed fixed. The customer edition leaves owner names out.
Domains
Manage your organization's domains in Settings > Domains. A counter shows how many you're using (for example, "2 of 5 domains used"). When you hit your plan's limit, the add button turns off until you remove a domain or upgrade.
Add a domain
- Select Add Domain.
- Enter the fully qualified domain name.
- Add a display name if you want one.
- Select Add Domain.
Edit a domain
You can change the display name any time. The fully qualified domain name locks once the domain has a scan, since uploads are matched to it.
Delete a domain
Admins can delete a domain from the table. A domain with no scans goes after one confirmation. A domain with scans takes a second, explicit confirmation, because deleting it also deletes every scan on it. Plans with a domain-change limit can only do this a set number of times before an upgrade.
Deleted scans can't be recovered.
Deleting a domain with scans removes its scans and its report history. Export any reports you need first.
Silenced findings
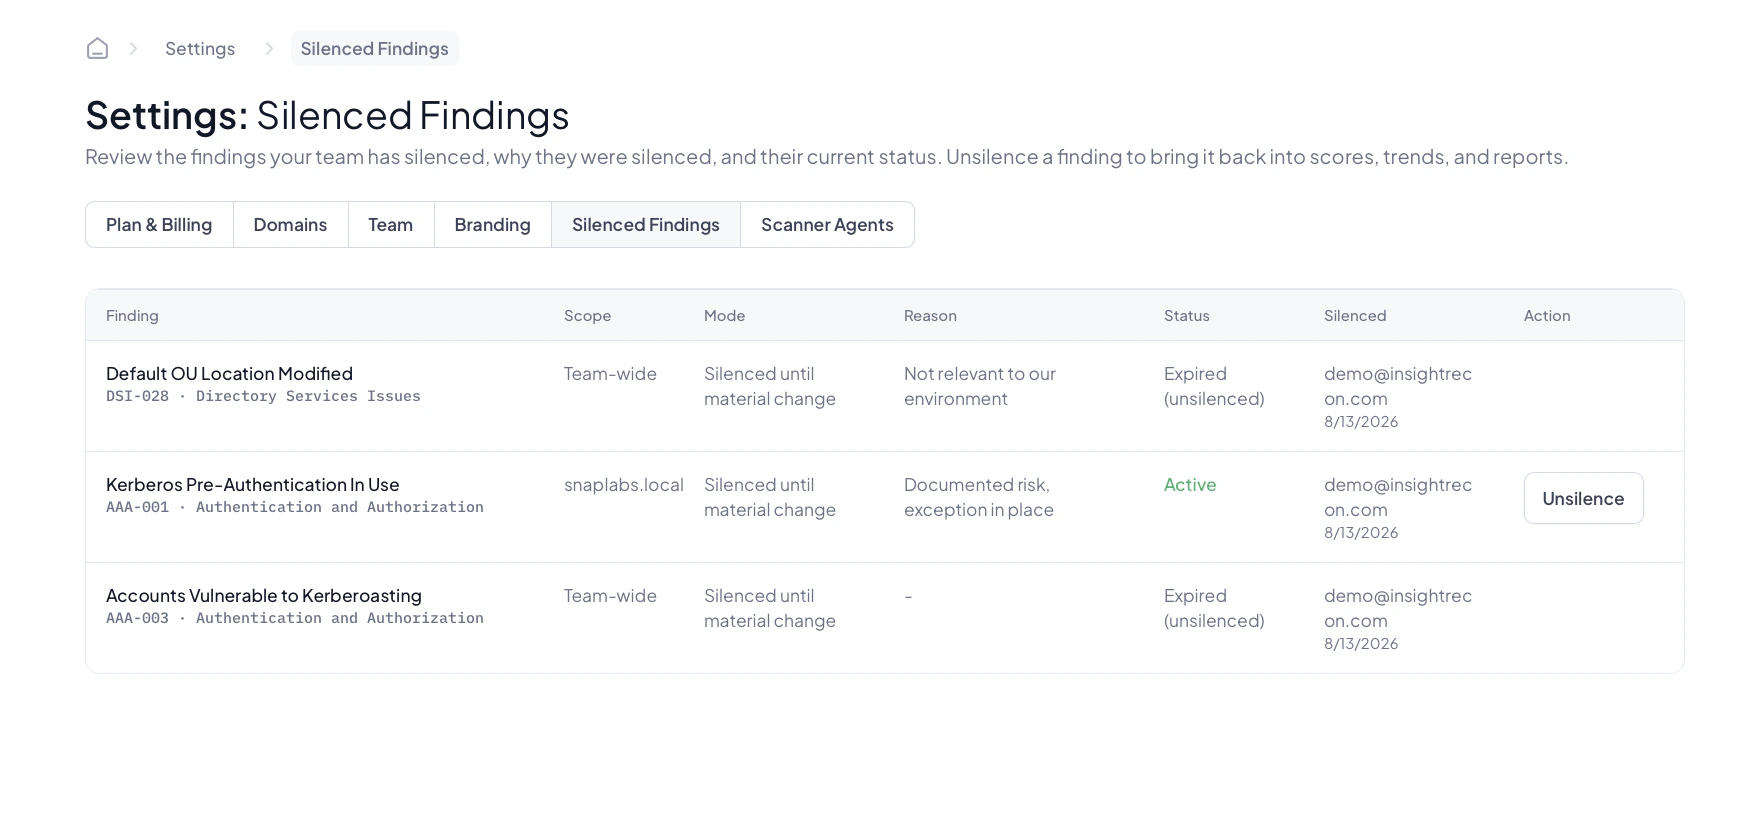
Settings > Silenced Findings lists every finding your team has silenced. You silence findings from the finding drawer on a scan (see Dashboard and reports). This page is the central record of that accepted risk. Each entry shows:
- The finding and the scope of the silence: one domain or the whole team.
- The mode: silenced permanently, or until something material changes.
- The reason given when it was silenced.
- Its current status and when it was silenced.
Admins can unsilence an entry from the Action column. The finding goes back to normal scoring and reporting the next time its scan data is viewed.
Silenced findings stay visible.
They're left out of scores, trends and counts, but they stay listed here, in the scan's Silenced tab and in an appendix of the exported report. The accepted risk is always there to review.
Team and permissions
Organization admins can invite people and give each one a role that fits the access they need.
| Role | Access | Good for |
|---|---|---|
| Admin | Full read and write across the organization: settings, domains, uploads, reports, billing and team members. | Product owners and trusted admins who manage users and portal settings. |
| Full Access | Read and write across the organization, including domains, uploads, reports and supported settings. Can't invite, remove or manage team members. | Security practitioners, consultants and anyone who runs scans and manages content without managing users. |
| Remediator | Updates the findings assigned to them without touching anything else. | Engineers working through the fixes. |
| Read only | Views the scans and reports they're allowed to see. Can't change settings or content. | Executives, auditors and other people in your organization who only need to review. |
To share results with a customer outside your organization, use the customer portal instead of a team seat. Customers only see the domains you share with them.
Invite a team member
- Open Settings > Team.
- Enter their name and email address.
- Pick a role.
- Select Send invite.
You can pick a role on plans with role-based access control. On other plans, invited members join with full admin access. Pending invites stay listed until they're accepted, with Resend and Revoke actions.
Free has one user and Standard includes 5. View-only users and Remediators are free and don't count toward Standard's 5. Every other login counts. Enterprise, Auditor and MSSP have unlimited users.
Edit a team member
- Open Settings > Team.
- Find the person.
- Select the pencil icon in the action column.
- Select the green checkmark to save.
Remove a team member
- Open Settings > Team.
- Find the person.
- Select the trash can in the action column.
- Select Confirm.
Check your team list now and then. Remove access when someone's role changes or they no longer need the portal.
Sharing reports with customers
The customer portal lets a managed service provider give each customer a read-only view of the results for their own domains. Customers sign in with their own account and only see the domains you share with them. It's on the Auditor and MSSP plans.
A customer account can:
- Open the home dashboard for the domains shared with them.
- Open every scan for those domains, including findings, environment profile, inventory and a customer edition of the exported report.
- Manage their own account, password and two-factor settings.
- Contact Insight Recon support about the platform itself.
A customer account can't:
- Upload scans, download the scanner or delete anything.
- See scans for domains you haven't shared, or any organization settings, team members, billing or branding.
- Silence findings or change plan features.
Invite a customer
- Open Settings > Customers.
- Enter the customer's name and email address.
- Select one or more of your domains to share.
- Select Send invite.
The customer gets an email naming your organization and the shared domains. They create an account with that email address and land on their own dashboard. Pending invites expire after seven days. You can resend or revoke them from the table.
Change the shared domains
- Open Settings > Customers.
- Select the pencil icon in the action column.
- Change the selected domains and select Save.
The change takes effect the next time the customer loads a page. A customer always needs at least one domain. To stop sharing everything, remove the customer.
Remove a customer
- Open Settings > Customers.
- Select the trash can in the action column.
- Select Confirm.
The customer loses access right away. Their scan data stays put, because the scans belong to your organization.
Customers don't use a seat.
Customer accounts don't count against your plan's user limit. You can't give them a team role either. To give someone full access to your organization, invite them from Settings > Team.
One account, one organization.
An email address that already has an Insight Recon account can't be invited as a customer. Ask the customer for a different address, or invite a colleague of theirs who doesn't have an account yet.
Branding
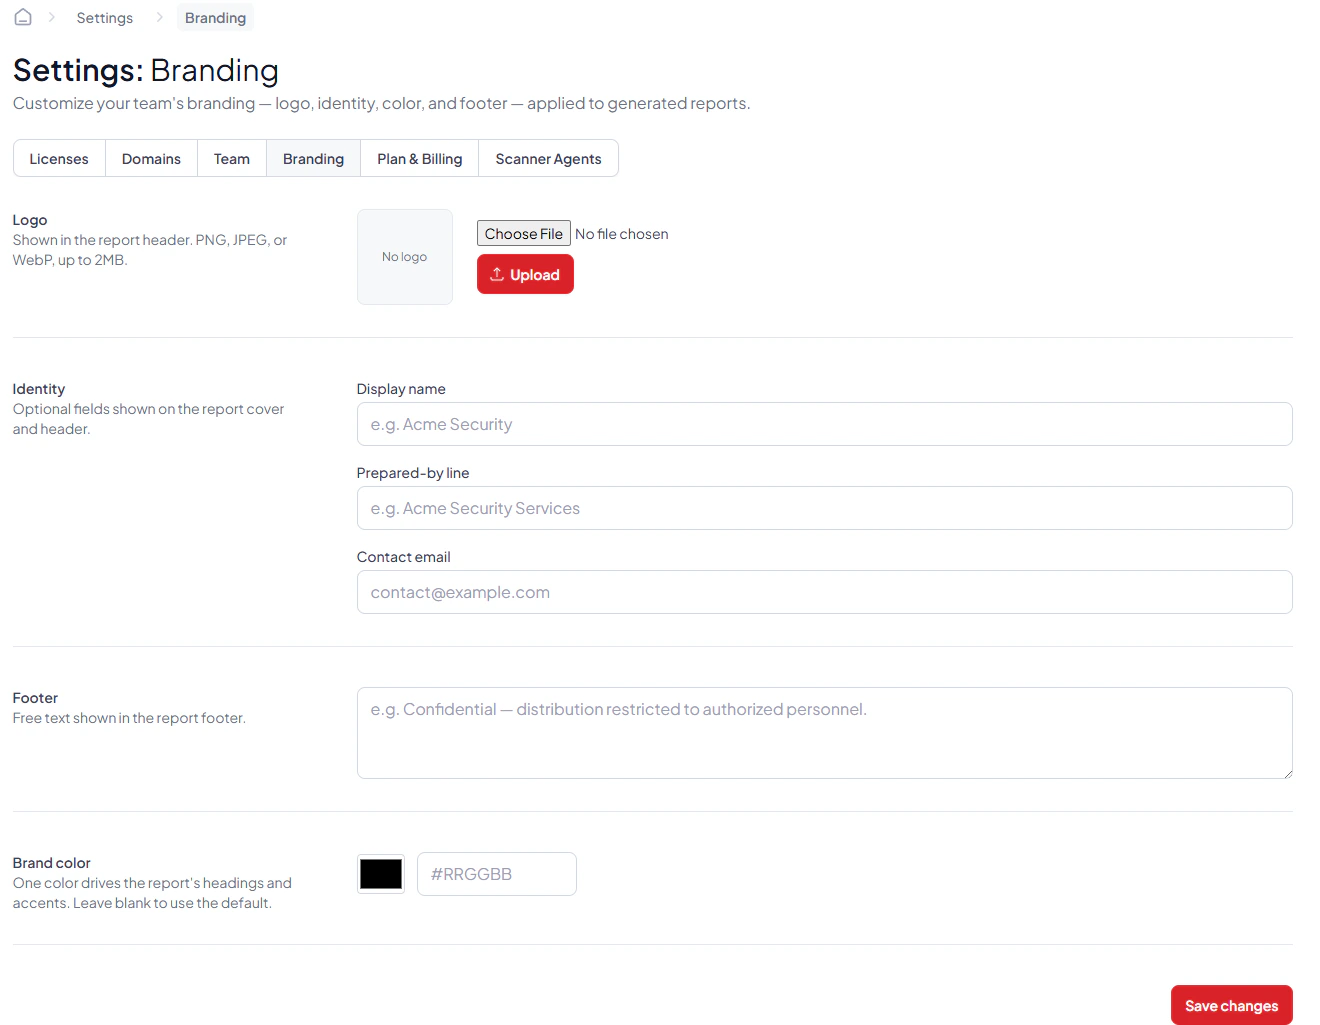
Paid plans can put your organization's identity, or your customer's, on reports. Only Admins can change branding.
On every paid plan
- A logo (PNG, JPEG or WebP, up to 2 MB).
- A display name.
- A primary brand color.
On plans with white-labeling
- Prepared-by text on the report cover.
- A contact email on the report cover.
- Report footer text.
Use a clean logo.
Pick one with good contrast and no tiny text, then check how it looks in the portal and in a generated report.
Plan and billing
Settings > Plan & Billing manages your subscription. Only Admins can open it.
- The current plan card shows your plan, its status and when it renews or expires. Check the date before scheduled client work.
- Compare plans opens the plan matrix, where you can upgrade to a paid plan yourself.
- Billing history lists past payments with invoice downloads.
- Subscription management covers your payment method and renewal for an active subscription.
If you're out of license capacity, talk to your organization's admin. For plan changes the page doesn't offer, contact support. See what's on each plan.
Scanner agents
Scanner agents run scheduled scans. An agent runs on a Windows machine you approve and sends results to the portal on its schedule. You can enroll an agent on any plan. Automatic scheduled scans need a plan that includes them.
Set them up well
- Use a dedicated, managed Windows machine.
- Protect the service account and give it the least privilege it needs.
- Make sure the machine can reliably reach the domain and Insight Recon.
- Write down who owns it, its maintenance windows and how alerts get handled.
- Check the agent's status after credential, network or endpoint security changes.
On every plan, scanner alerts email you when an agent goes 30 minutes without checking in or a scheduled scan fails.
Scheduled scanning depends on your plan.
You can enroll agents on any plan, but setting automatic schedules needs a plan with scheduled scans. The Scanner Agents page stays empty until an agent checks in.
Email alerts
Insight Recon sends four kinds of email. Each person picks which ones they get.
| What it's for | |
|---|---|
| New-finding alerts | On Standard, Enterprise and MSSP. After a scan, one email lists the findings that weren't there last time, filtered to the severities and categories you pick. It never names the affected accounts or computers. |
| Scanner alerts | On every plan, including Free. You hear when a scanner goes 30 minutes without checking in or comes back online. You also hear when a scheduled scan fails or a scanner isn't set up. |
| Findings assigned to me | An email when findings are assigned to you. |
| Monday remediation digest | Sent on Mondays, only when something needs attention. |
Admins set the defaults for each role. They can also add up to five outside addresses, like a shared inbox or a ticketing system. An outside address gets nothing until someone there confirms it.
Account settings
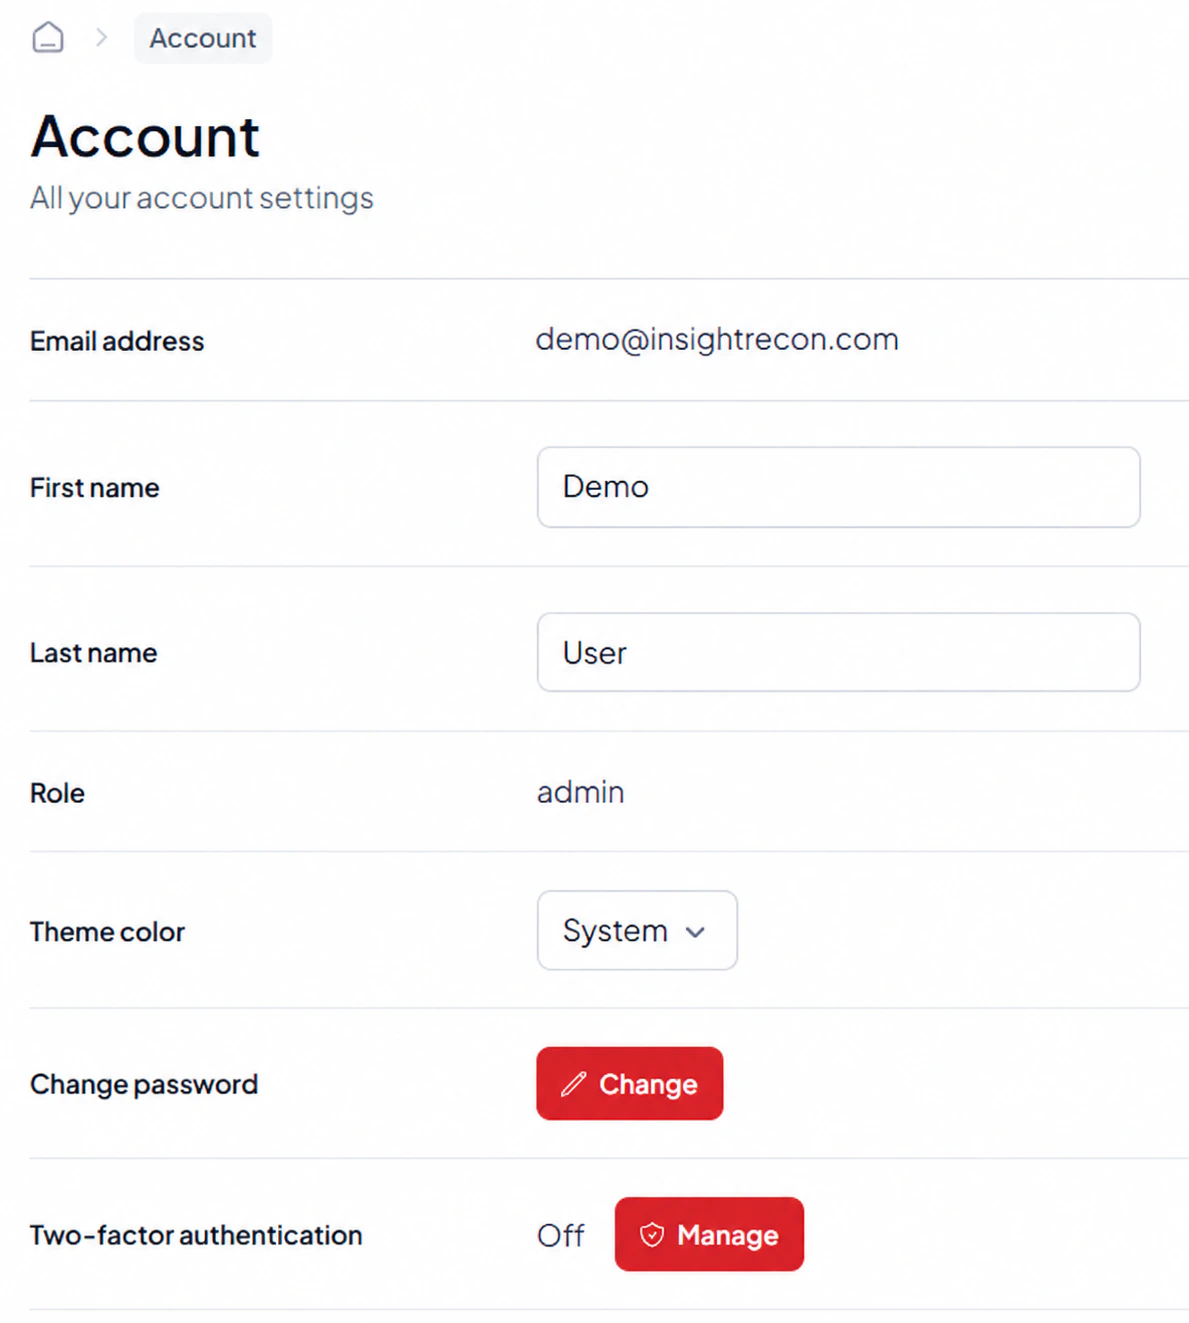
Each person manages their own preferences and security on the Account page. These settings only affect your own account.
Open the Account page
- Select your name in the top-right corner of the portal.
- Select Account.
- Update your profile, theme, password or MFA settings.
What you can change
| Setting | What you can do |
|---|---|
| Name | Change the first and last name shown in the portal. Your email address and role are shown for reference and can't be changed here. |
| Theme color | Pick System, Light or Dark. |
| Password | Change your password with a code we email you. For local accounts (username and password). Federated accounts manage their password with their identity provider. Use a unique password you don't use anywhere else. |
| Multi-factor authentication | Turn on MFA, check its status or manage your current setup. MFA applies to local accounts. Federated accounts are protected by their identity provider. |
Change your profile or theme
- Open the Account page.
- Change your name or pick a new theme.
- Save.
Change your password
- Open the password section on the Account page and select Change.
- Enter the code we emailed you.
- Enter your new password twice.
- Save, then use the new password next time you sign in.
Turn on or manage MFA
- Open the MFA section on the Account page.
- Choose to turn on or manage MFA.
- Follow the steps on screen.
- Keep any recovery codes somewhere safe and approved.
Every portal user should turn on MFA.
It protects the account if a password leaks or gets reused.
03The scanner
Scanner options
On Windows, the installed scanner gives you two ways to work. The GUI walks you through everything and is the right choice for most people. The CLI does the same setup and scanning from a terminal. A separate portable edition runs either one from a zip, with no install or sign-in, for machines where installing software isn't practical. On Linux, the scanner is a portable command-line edition in a tar.gz.
Recommended
Windows app (GUI)
A guided app for sign-in, connection setup, scanning, settings and schedules.
Read moreAdvanced
Command line (CLI)
Setup, readiness checks, scheduled scans and the Windows service, all from a terminal.
Read moreNo install
Portable scanner
A Windows zip that scans without an install or admin rights and saves a results file for you to upload.
Read moreLinux
Linux scanner
A portable tar.gz for supported Linux distributions. Command line only. You upload the results file yourself.
Read moreWelcome and sign in
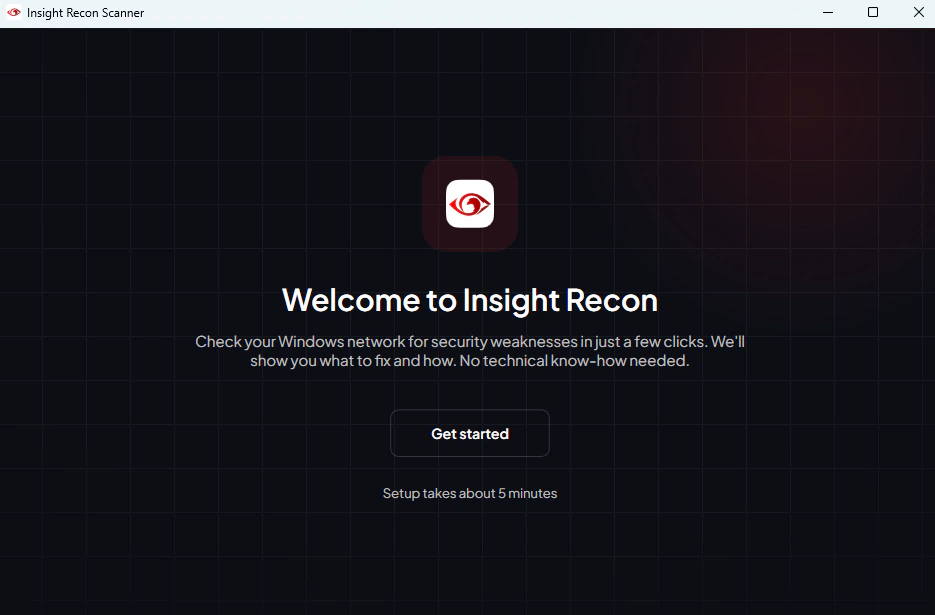
The scanner is a Windows app that connects to Active Directory, runs scans and sends the results to your portal. Open it after you download it and start from the welcome screen.
Start the scanner
- Open Insight Recon on the Windows machine that will run the scan.
- Read the welcome screen.
- Select Get started.
Sign in to Insight Recon
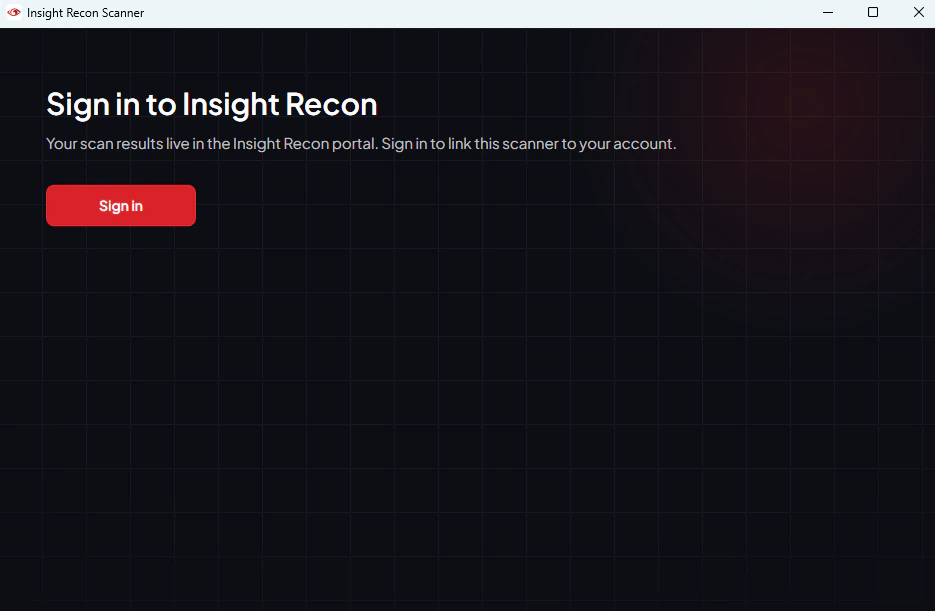
The scanner uses your portal account to authorize itself and tie scans to your organization.
- Select the sign-in option in the scanner.
- Your default browser opens the Insight Recon sign-in page.
- Sign in with your portal account.
- Enter your verification code if you have multi-factor authentication turned on.
- The scanner picks up automatically once you're signed in.
Already signed in?
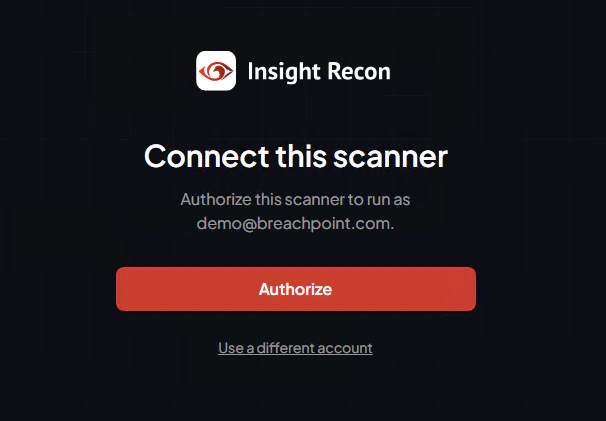
If your browser already has a portal session, you'll see an authorization page instead of the sign-in form. Check the request and select Authorize to connect the scanner.
Connection setup
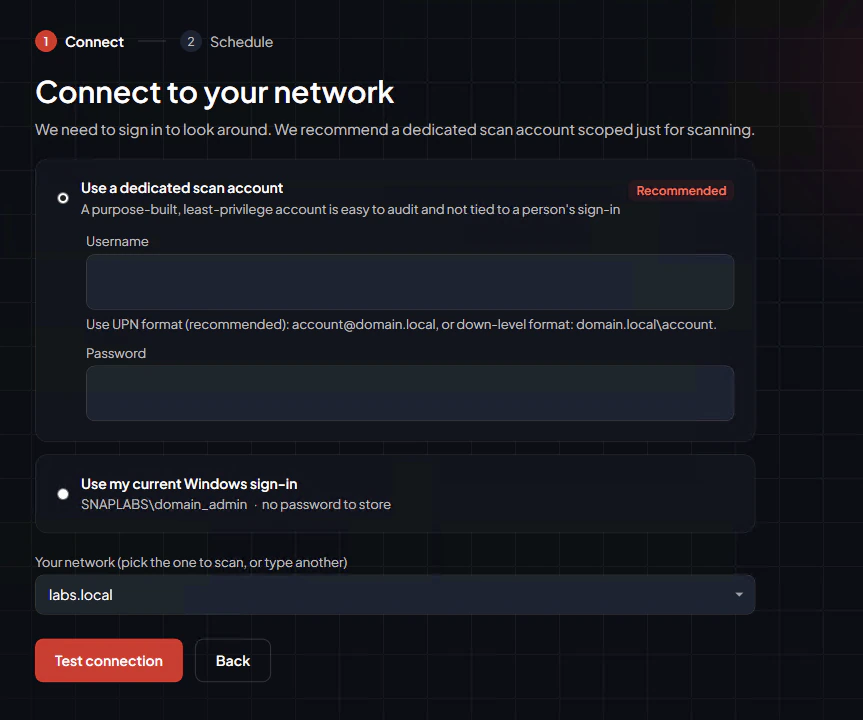
After you authorize it, the scanner shows the connection setup page. Use it to tell the scanner how to reach the domain you're scanning.
Choose how the scanner signs in
- Use a dedicated scan account (recommended). Enter the credentials for a purpose-built, least-privilege account, in UPN format (
[email protected]) or down-level format (domain.local\account). - Use my current Windows sign-in. The scanner connects as the signed-in Windows user through integrated authentication.
Set up the connection
- Confirm the domain. The dropdown lists the domains this machine can see. Pick one or type another.
- Enter the account details approved for the scan.
- Check the values.
- Select Test connection.
Test the connection
The scanner runs a set of connection checks before it lets the scan start. Required checks have to pass. Optional checks can fail without stopping you. If one does, the scanner shows Connected, with limited coverage, which means the scan runs but some checks can't be assessed.
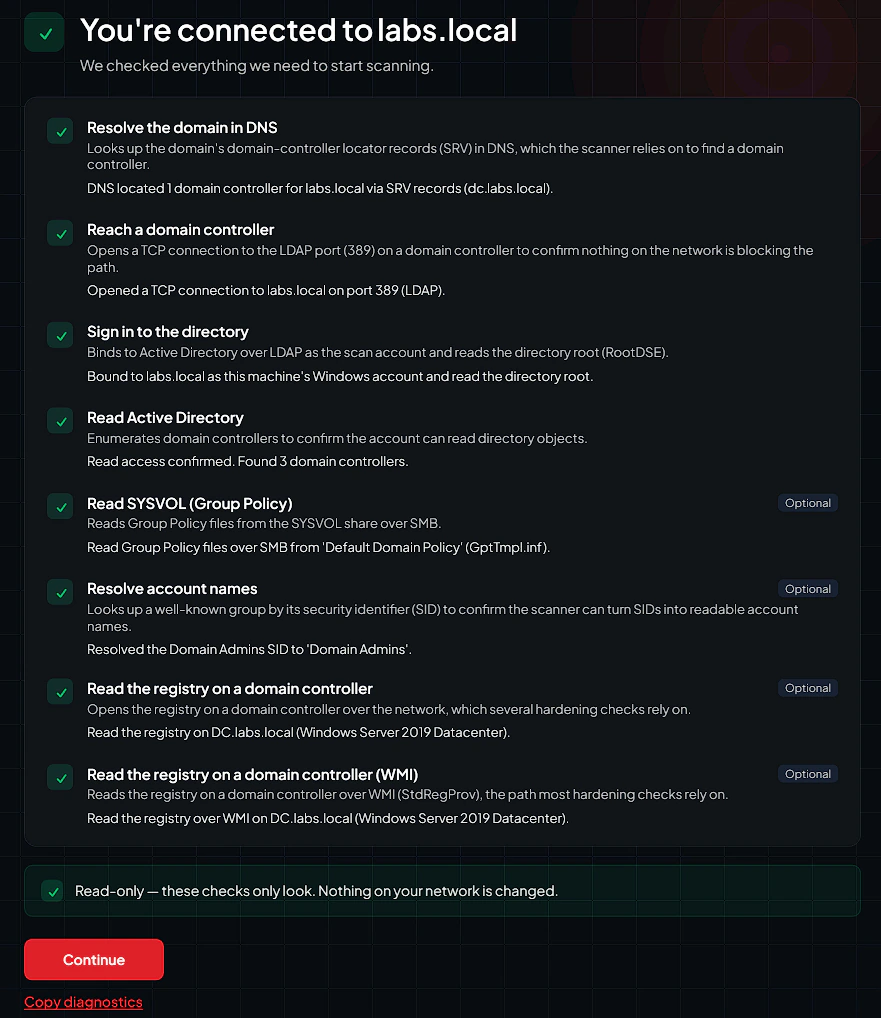
Don't continue past failed connection tests.
Failed checks can leave gaps in your results. Check the credentials, DNS, network access and domain controller connectivity, then test again.
Run a scan
When the connection tests pass, select Continue to start the scan. The scanner shows its progress while it collects data and uploads it for analysis.
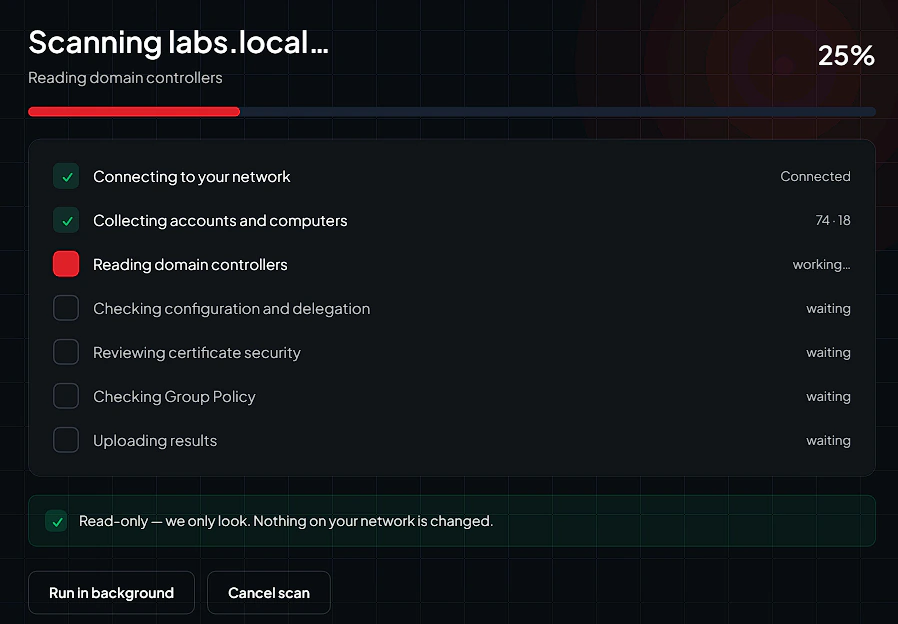
Finish the scan
During first-time setup, the scanner moves straight on to the Schedule step when the first scan finishes (or tells you you're all set). After later scans, it shows the final status. Read it, then select Back to dashboard.
Online scans upload automatically.
When the scanner is authorized and online, finished results go to the portal on their own. If the upload can't finish, use the manual upload steps.
Scanner home
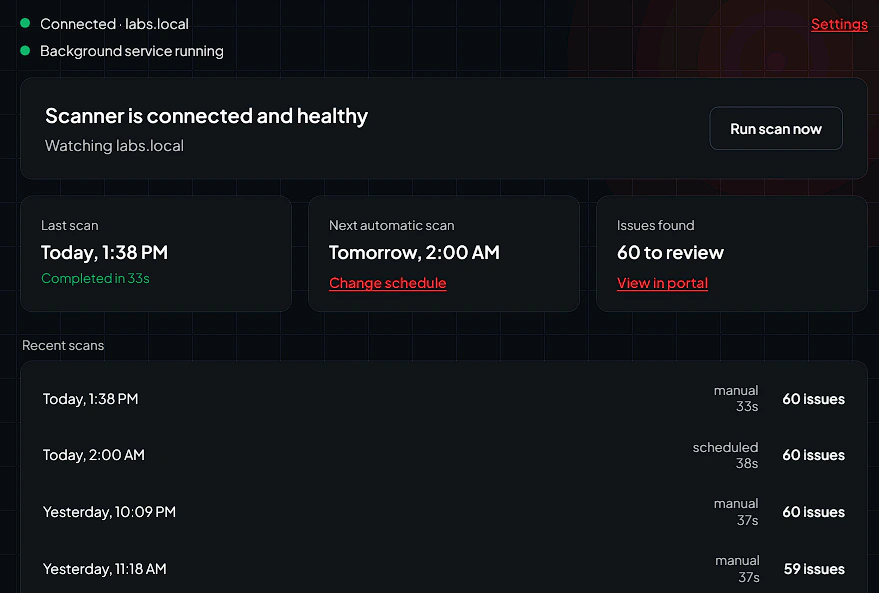
Back to dashboard opens the scanner's home page, with quick access to common actions and recent activity. From there you can:
- Select Run scan now to start a new scan.
- Select View in portal to open the results in the Insight Recon portal.
- Open Settings to manage connections, sign-in and scanner configuration.
- Select Change schedule to set up automatic scans. On plans without scheduled scans, it reads Upgrade to schedule scans instead.
- Review recent scans and their status.
- Check the summary cards and service health, including a banner when your plan's scan capacity is running low.
Scanner settings
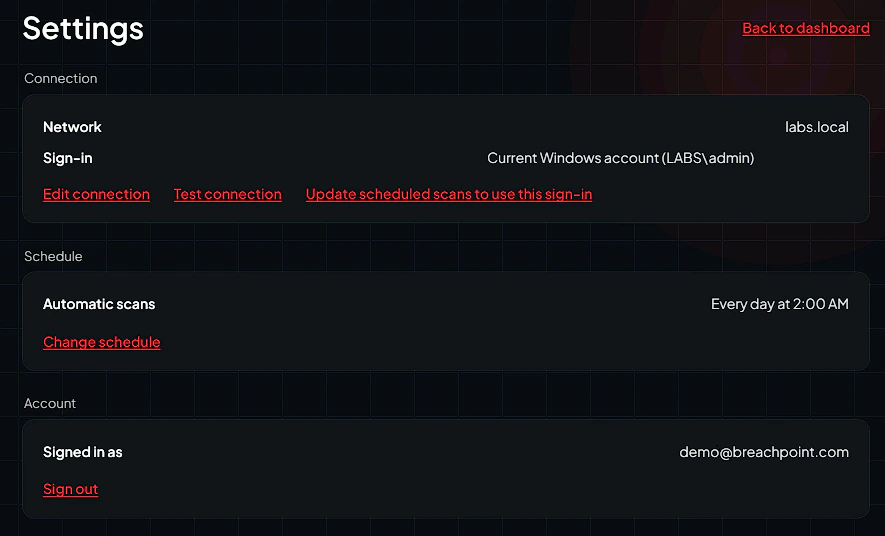
Open Settings from the scanner home page to manage how the scanner is set up. You can:
- Edit the saved Active Directory connection.
- Test an existing connection.
- Point scheduled scans at your current sign-in after you sign in again or rotate credentials. This only shows up when the scanner service is installed. It triggers an admin approval (UAC prompt).
- Open the scan schedule.
- Sign out of the Insight Recon account the scanner is using.
Test the connection after any change.
New credentials, domain details, DNS, VPN access or network routing can all affect future scans.
Scan schedule
With scheduled scanning on, the scanner runs scans by itself. Open the schedule from the home page or Settings. Scheduled scans need a plan that includes them. On other plans, the button reads Upgrade to schedule scans. You also need one successful scan on the machine before you can turn on automatic scans.
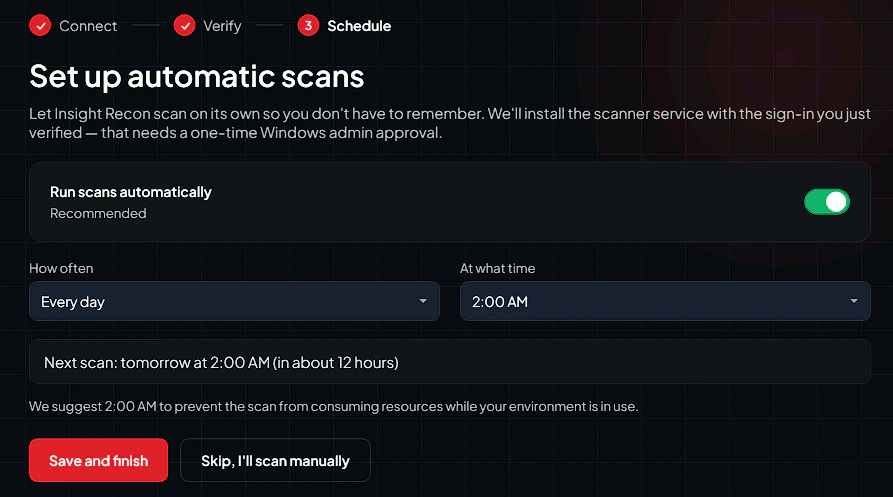
Set up automatic scans
- Open Change schedule.
- Turn automatic scanning on or off.
- Pick how often and when: daily, weekly on the day you choose, or monthly on the week and day you choose.
- Select Save and finish.
The first time you turn on automatic scans, the scanner installs its Windows service, which needs a one-time admin approval (UAC prompt). The schedule syncs to your account. You can also manage it from the portal's Scanner Agents page.
Keep scheduled scans running
- Keep the scanner machine on and connected to the domain at the scheduled time.
- Make sure the saved connection and the portal authorization stay valid.
- Check recent scans now and then to confirm scheduled scans are finishing.
- Update the schedule after maintenance windows, credential changes or network changes when you need to.
CLI scanner overview
The command-line scanner installs at C:\Program Files\InsightRecon\Scanner\insightrecon.exe. The installer offers to add that folder to your system PATH (the option is ticked by default). With it on, you can run insightrecon from any Command Prompt or PowerShell window. The CLI suits admins who prefer a terminal or want a light way to set up and run the scanner without the GUI.
On Linux, the CLI is the scanner. The Linux edition is portable only, with no sign-in and no service or config commands. See the Linux scanner. The CLI sections that follow cover the installed Windows CLI.
Most people should use the GUI.
Use the CLI when a terminal fits your workflow better, for automation or troubleshooting.
Open the CLI
- Open Command Prompt or PowerShell.
- Run
insightreconfrom any folder. - Finish the first-run setup when it asks.
Commands outside the menu
Besides the interactive setup, the CLI has direct commands:
preflightruns the connection and permission checks on demand. It takes the same credential options and password fallbacks asadcheck.config set-credentials,config clear-credentialsandconfig statusmanage the stored scan credentials.service install,service provision,service statusandservice uninstallmanage the Windows service that runs scheduled scans. Runservice provisionafter you sign in again or rotate scan credentials so the service picks up the new values.
Run a scan directly
insightrecon adcheck runs a scan without the interactive menu:
insightrecon adcheck --domain domain.local--domainsets the domain name, or--serversets a domain controller host name.--serverUsernameand--serverPasswordsupply a dedicated scan account. Leave out the password and the scanner reads it from theINSIGHTRECON_SCAN_PASSWORDenvironment variable or asks for it with a masked prompt.--outputsets the folder for the.irscanresults file.--skip-preflightskips the readiness checks. Otherwise they run before every scan and stop it if a required check fails.
insightrecon --version prints the scanner version. insightrecon <command> --help shows the options for any command. --unattended prints the sign-in URL instead of opening a browser.
First sign-in
The first time you run it, or if the scanner hasn't been connected before, the CLI tries to open your default browser to sign in. It also prints the authorization URL so you can open it yourself if the browser doesn't launch.

- Sign in to the Insight Recon portal in the browser.
- Review the scanner connection and authorize it.
- Wait for the browser to confirm it worked.
- Close the browser and go back to the CLI.
Don't share the authorization URL.
Treat sign-in links and authorization values like session secrets.
CLI setup workflow
After you sign in, the CLI walks you through setup step by step. Take the detected defaults when they fit, or enter your own when the scan needs to target a different environment.
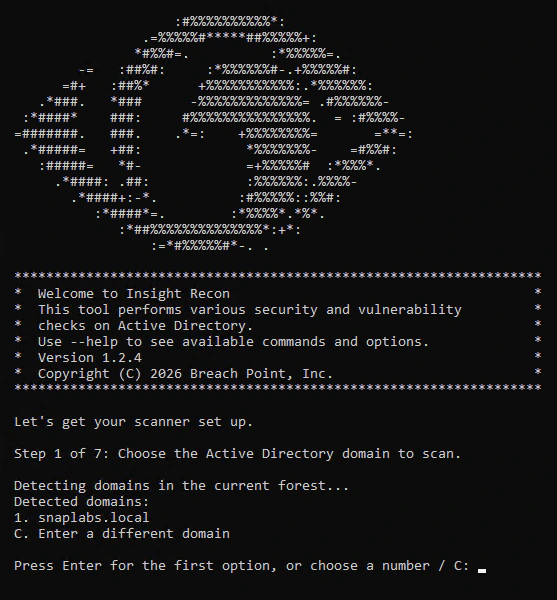
Choose the domain
The scanner finds the Active Directory domains it can see and lists them as numbered options. Press Enter for the first one, type a number or choose the custom domain option. The CLI then confirms the domain name with the directory before it moves on.
Save the scan target
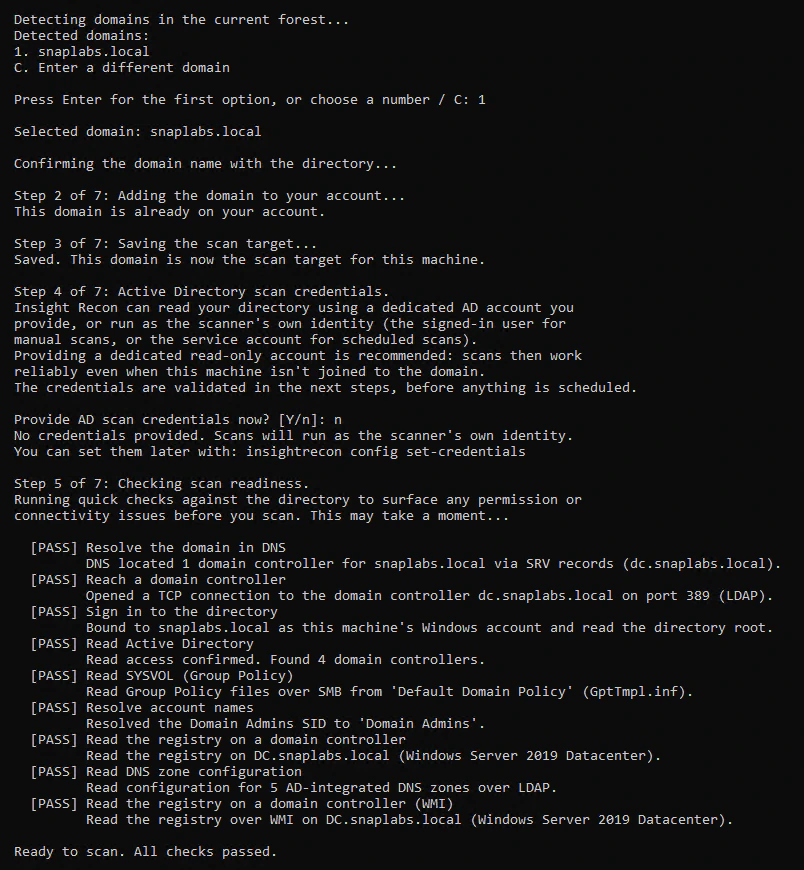
Once you pick the domain, the scanner adds it to your Insight Recon account (or confirms it's already there). It saves the domain as the scan target for future runs on that machine and syncs it to your account, where it shows on the portal's Scanner Agents page.
Choose the scan credentials
The CLI asks whether you want to give it dedicated Active Directory scan credentials.
- Answer y to enter separate credentials for the scan. The username has to include the domain. The UPN form (
[email protected]) is best. - Answer n to scan as the scanner's own identity: your signed-in account for manual scans, or the service account for scheduled scans.
Dedicated read-only credentials help with scheduled scans, machines that aren't domain joined and cases where the signed-in account can't see enough of the directory.
Run the readiness checks
The scanner checks DNS resolution, domain controller reachability, directory sign-in, Active Directory reads, SYSVOL access, DNS zone configuration reads, account name resolution and registry access over both Remote Registry and WMI. If a required check fails, setup stops and the CLI offers to re-enter credentials or exit. Warnings don't stop setup, but they reduce scan coverage. The results are saved with each scan and shown on its page in the portal.
A failed required check blocks the scan.
Setup won't continue until the required checks pass. Warnings let the scan run but can leave gaps in coverage. Fix them when you can.
Verification scan and scheduling
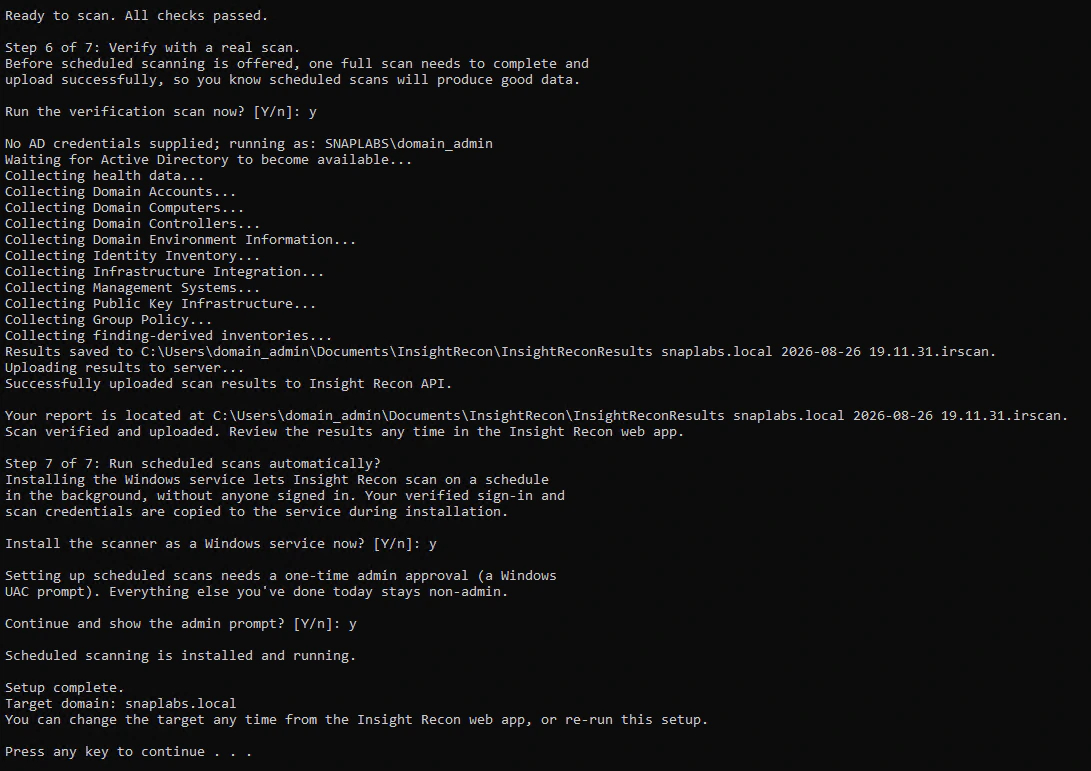
Once the readiness checks pass, the CLI asks you to run a verification scan, then offers to set up scheduled scans.
Run the verification scan
Answer y to run it now, or n to finish setup without one. Saying no also skips the scheduling step. You can come back to it by running setup again. Scheduled scans need a verification scan that uploaded successfully. If the scan or its upload fails, the CLI offers a retry menu.
If you run it, the CLI:
- Runs the Active Directory health check.
- Collects accounts, computers, domain controllers, policy, identity, infrastructure, PKI, Group Policy and related inventory.
- Saves the results file locally.
- Uploads the results automatically when it can reach the portal and is authorized.
- Shows the local file path so you can upload it by hand if you need to.
Keep the results file until the portal has processed it.
You can upload the .irscan file by hand if the automatic upload doesn't finish.
Set up scheduled scans
After the verification scan, choose whether to run scheduled scans. They need a plan that includes them. Saying yes installs the scanner as a Windows service, which needs a one-time admin approval (UAC prompt), then asks whether to start the service now. Scheduled scans run daily at 2:00 AM by default. The schedule syncs to your account. You can change it later on the portal's Scanner Agents page.
Returning to the CLI
After setup, the scanner remembers the saved domain on that machine. Later launches show a short menu instead of running the full setup again.
| Option | What it does |
|---|---|
| 1. Run a scan now | Runs a new scan with the saved setup. |
| 2. Set up scheduled scanning | Sets up the Windows service for automatic scans, after fresh readiness checks and a verified scan. Tells you if the service is already installed. |
| 3. Re-run setup | Goes back to setup so you can change the domain, credentials, schedule or service. |
| 4. Exit | Closes the CLI without changing anything. |
Re-run setup when things change.
Update the setup when the domain, credentials, connectivity, schedule or scanner machine changes.
Portable scanner overview
The portable scanner is a zip edition of the Windows scanner. It runs without an install or admin rights. It doesn't sign in to the portal either. Get it from the same Download scan tool dialog as the installer, extract it and run it. On Linux, the Linux scanner is the portable equivalent.
The extracted folder has two executables:
insightrecon-portable.exeis the guided app: connect, scan and get the results file.insightrecon.exeruns the same scan from the command line, for terminals and scripts.
When to use it
- One-off assessments where installing software isn't practical.
- Consulting work on a machine you don't own or manage.
- Locked-down environments where an installer needs change approval but a standalone tool can run from a user folder.
How it differs from the installed scanner
- No sign-in. It never connects to your Insight Recon account.
- Scan credentials stay in memory for that session only. It writes no configuration to the system.
- It saves the encrypted
.irscanfile next to the executable. You always upload results by hand in the portal.
Some features need the installed scanner.
Automatic upload, scheduled scans, the Windows service and portal-managed scanner agents only come with the installed edition.
Run a portable scan
Download and extract the zip
Sign in to the portal, select Download scan tool on the dashboard and choose the portable zip. Extract it to any folder you can write to. The results file lands there when the scan finishes.
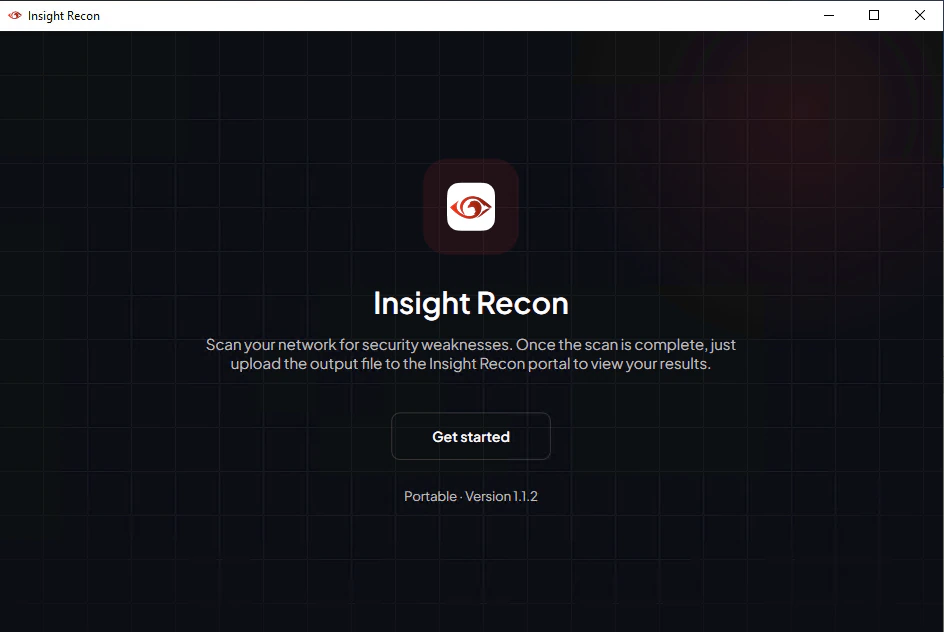
Start the portable scanner
Run
insightrecon-portable.exefrom the extracted folder and select Get started. No install or admin rights needed.Connect to the domain
Use a dedicated scan account or your current Windows sign-in. Confirm the detected domain or enter another, then select Test connection. The scanner checks connectivity and permissions before the scan starts.
Run the scan
Start the scan and leave the scanner open until it finishes. An interrupted scan produces no output.
Upload the results file
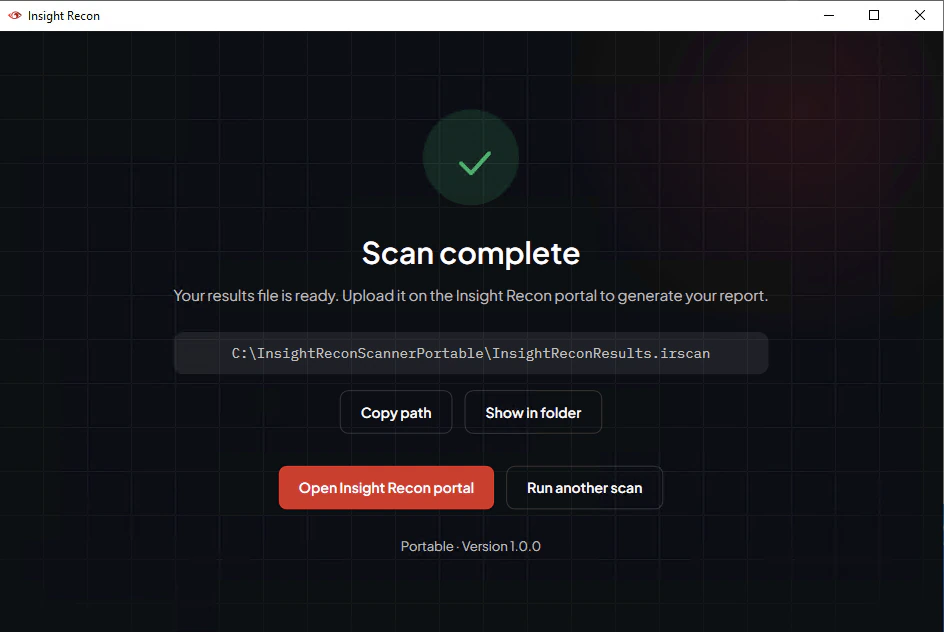
The completion screen shows where the
.irscanfile was saved, with buttons to copy the path or open its folder. Select Open Insight Recon portal, sign in and upload the file with the manual upload steps to get your report.
You can upload from a different machine.
If the scanned machine has no internet access, copy the .irscan file to any machine that can reach the portal and upload it there. The file is asymmetrically encrypted, but it still holds security assessment data. Handle it with care.
Command-line use
The bundled insightrecon.exe runs in portable mode and doesn't need a sign-in. Run it with no arguments to see usage. To run a scan:
insightrecon adcheck --domain domain.local--serverUsernameand--serverPasswordsupply a dedicated scan account. Leave out the password and the scanner reads it from theINSIGHTRECON_SCAN_PASSWORDenvironment variable or asks with a masked prompt. On Windows, leave out the credential options entirely to scan as the current Windows sign-in.--outputsets the folder for the.irscanfile. By default it's written next to the executable.- Readiness checks run inside every
adcheckand stop the scan if a required check fails.insightrecon preflight --target domain.localruns the same checks on their own, with the same credential options and password fallbacks.--skip-preflightskips them onadcheck.
When the scan finishes, the CLI prints where the results file is and the portal address for uploading it.
Linux scanner overview
The Linux scanner is a portable command-line edition, shipped as a tar.gz for x64 and ARM64. It's included with Enterprise, Auditor and MSSP. Like the Windows portable edition, it runs without an install or a portal sign-in: extract it, run the scan and upload the .irscan file in the portal yourself.
The .NET runtime is bundled. There's no runtime to install, but the host does need a few native libraries (see Linux prerequisites).
When to use it
- Scans run from a Linux workstation or jump host, like a consultant's or a red team's setup.
- Environments where no suitable Windows machine can reach the domain.
How it differs from the Windows scanner
- Command line only. There's no GUI.
- No portal sign-in and no automatic upload. You always upload results by hand.
- No service mode, scheduling or portal-managed scanner agents.
- A few checks need Windows-only collection and show as Not assessed (see Linux scan coverage).
The extracted tarball holds the insightrecon executable, its configuration and a README that covers prerequisites and troubleshooting.
Use the Windows scanner for continuous monitoring.
Scheduled scans, automatic upload and the guided GUI only come with the installed Windows edition. The Linux scanner is built for on-demand assessments.
Linux prerequisites
The host needs three native components: an OpenLDAP client library, MIT Kerberos and the Cyrus SASL GSSAPI plugin (the MIT variant, since Heimdal isn't supported). Don't assume they're installed. Most base images ship with none of them.
Supported distributions
| Tier | Distributions |
|---|---|
| Reference | Debian 13 (trixie). |
| Supported | Debian 12, Ubuntu 22.04 / 24.04 / 26.04 LTS, RHEL / Rocky / Alma 9 and 10, Kali rolling, Parrot. |
| Known to work | Debian 11, Ubuntu 20.04, RHEL / Rocky 8, Fedora, openSUSE Leap / SLES, Arch / BlackArch, Amazon Linux 2023. |
| Not supported | CentOS 7 / RHEL 7, macOS, Alpine and other musl-based distributions. |
Install the packages
sudo apt-get install -y libldap2 libkrb5-3 libsasl2-modules-gssapi-mitsudo dnf install -y openldap krb5-libs cyrus-sasl-gssapisudo dnf install -y openldap-clients krb5-libs cyrus-sasl-gssapisudo zypper install -y openldap2-client krb5 cyrus-sasl-gssapiOn Debian and Ubuntu, the OpenLDAP package name changes between releases: libldap2 on Debian 13 and Ubuntu 24.04; libldap-2.5-0 on Debian 12 and Ubuntu 22.04; libldap-2.4-2 on the oldest releases.
Kerberos
The scanner signs in to the domain with Kerberos and gets its own ticket from the credentials you give it:
- You don't need a krb5.conf, kinit or a domain join. A host with no Kerberos configuration works. So does one configured for an unrelated realm.
- The host's DNS must point at a domain controller so the KDC can be found through the domain's
_kerberos._tcpSRV records. - It needs MIT Kerberos. Where a distribution offers both, install the MIT SASL plugin (
libsasl2-modules-gssapi-mit) rather than the-heimdalone. If only Heimdal is there, the scanner reports a clear load failure.
Check before your first scan
Confirm the native components resolve:
ldconfig -p | grep -E 'libldap|libkrb5|libgssapi_krb5'ls /usr/lib/*/sasl2/libgssapiv2.soConfirm DNS can find the KDC:
dig +short SRV _kerberos._tcp.<your-domain>Each command should return something. If one comes back empty, go back to the package list above or check the host's DNS settings.
The README in the tarball covers edge cases.
Edge cases like disjoint Kerberos namespaces and unpopulated reverse DNS zones are covered in the README.md that ships with the scanner, along with each distribution's library names.
Run a Linux scan
Download and extract the tarball
Sign in to the portal, select Download scan tool on the dashboard, open the Linux tab and download the x64 or ARM64 archive. Extract it to any folder you can write to. The results file lands there when the scan finishes.
Install the prerequisites
Install and check the native packages as described in Linux prerequisites.
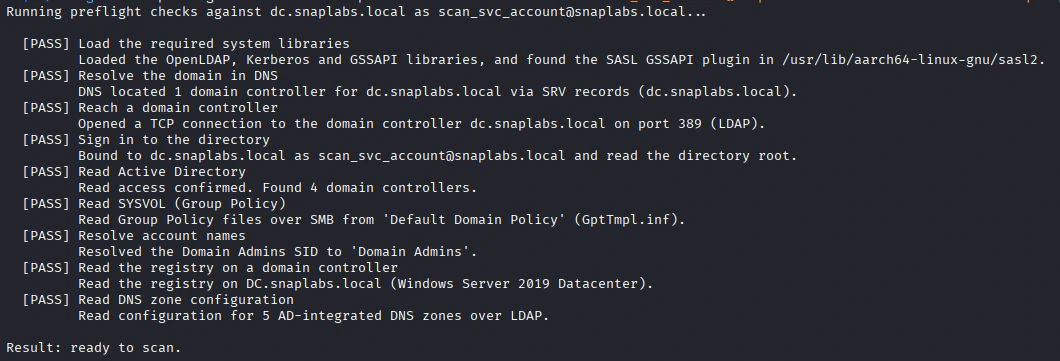
Check readiness
Check connectivity, credentials and permissions on their own:
./insightrecon preflight --target <domain>It takes the same credential options as
adcheckbelow, including the masked password prompt. The same checks also run at the start of every scan and stop it if a required check fails.--skip-preflightskips them.Run the scan
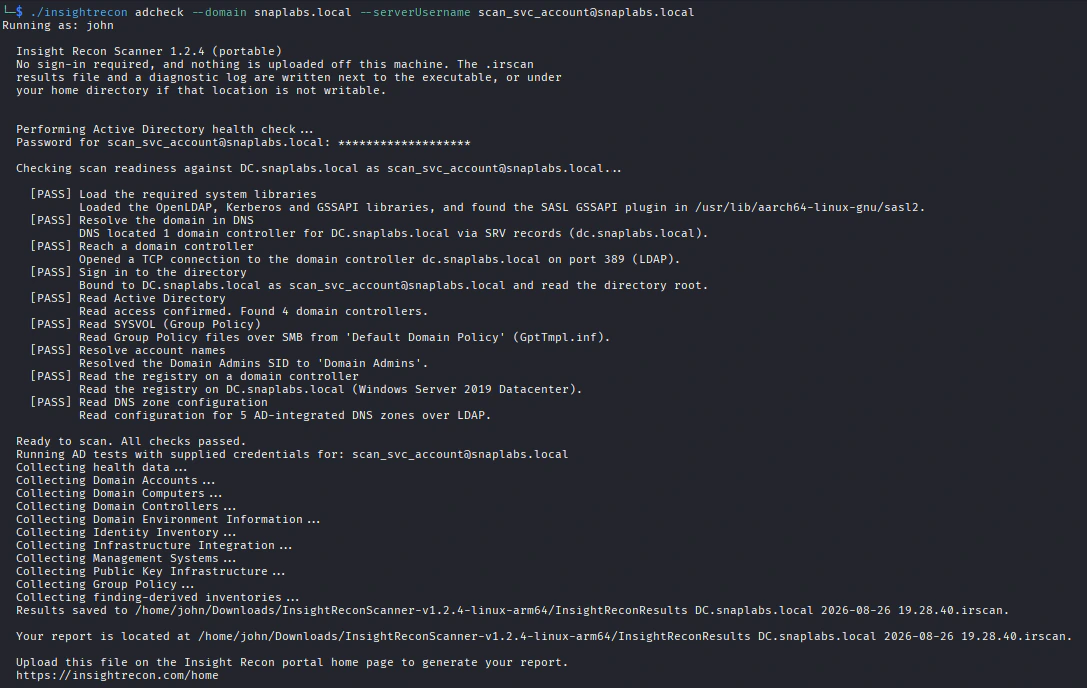
./insightrecon adcheck --domain <domain> --serverUsername [email protected]It asks for the password with a masked prompt. You can also supply it with the
INSIGHTRECON_SCAN_PASSWORDenvironment variable or--serverPassword.Find the results file
The
.irscanfile is written next to the executable, or to the folder you set with--output. If the executable's folder isn't writable, it falls back to your home directory. The CLI prints the file location and the portal address when the scan finishes.Upload the results file
Open the portal from any machine, sign in and upload the file with the manual upload steps to get your report.
Credentials
- Use the UPN form for the scan account's username (
[email protected]). - Credentials stay in memory for that run only. Nothing is written to the system.
- To use a Kerberos ticket you already hold instead of a password, leave out the credential options and point
KRB5CCNAMEat a credential cache with a valid TGT for the scan account. The scanner binds with that ticket instead of getting its own.
You can upload from a different machine.
If the scanned machine has no internet access, copy the .irscan file to any machine that can reach the portal and upload it there. The file is asymmetrically encrypted, but it still holds security assessment data. Handle it with care.
Linux scan coverage
Scans collected on Linux are checked against the same check library as Windows scans. Analysis happens after the upload, which means the scanning machine's platform doesn't change what a check looks for. Nearly every check is fully assessed from a Linux scan.
- A few checks depend on Windows-only collection, such as each domain controller's last boot time over WMI and some delegation identity lookups. They show as Not assessed: Needs a Windows scanner.
- A few per-domain-controller registry checks can only be read remotely with an administrative scan account. They're still assessed when the setting comes from Group Policy, since the scanner reads that from SYSVOL.
The scan page's Assessment coverage card shows what was assessed, notes that the Linux scanner collected the scan and links to the Not assessed tab, where each skipped check lists its reason.
Full coverage needs a Windows scan.
To assess the Windows-only checks, scan the same domain from a Windows machine. Both editions produce the same report format, which makes the results directly comparable.
04Security and help
Data handling
Insight Recon collects the directory and configuration information it needs to find security problems and build your reports. Treat scan files and exported reports as sensitive security data. For how we store and protect your data, see our security page.
Kinds of data it collects
- Directory object attributes and relationships.
- Identity, group, privilege, policy and configuration information.
- Security-relevant infrastructure and certificate configuration.
- Your Microsoft Entra hybrid footprint as recorded in on-prem Active Directory (tenant, sync and SSO configuration). It comes from the directory only. The scanner never connects to Microsoft Entra or any cloud API.
- Finding evidence and posture history.
Protection in transit and at rest
The .irscan file is encrypted on the scanning machine before it leaves, which protects its contents in transit and wherever the file is stored. Uploaded scan data is kept in private storage scoped to your organization.
What it isn't built to collect
The scanner isn't designed to collect user passwords, password hashes, Kerberos tickets or NTDS database contents. Keep the credentials you scan with under your control and protect them the way your organization's policy says.
Protect local files.
Keep scanner packages, results files and exported reports in approved locations only. Delete temporary copies when you're done with them.
Troubleshooting
The scanner can't reach the domain
- Make sure DNS resolves the domain and its domain controllers.
- Check network routing, VPN access, firewall rules and the services the scan needs. Every port is listed on our security page.
- Test the credentials against the domain you meant to scan.
- Try again from a machine closer to the domain.
The scan finishes with missing or partial data
- Make sure the account can read the directory objects and configuration containers involved.
- Look at the scanner's warnings and your endpoint security events.
- Check whether network filtering blocks particular domain controllers or services.
- Run the scan again after you fix access or connectivity.
Antivirus or EDR blocks the scanner
- Confirm you downloaded the package from the Insight Recon portal while signed in.
- Check the file with your organization's software approval process.
- If it's a confirmed false positive, submit it to the security vendor.
- Only add an exception your security team approves. Keep it as narrow as you can.
A new scan doesn't show up in the portal
- Make sure the upload finished.
- Refresh the domain page and check you picked the right organization and domain.
- Check the file's scanner version and that the file is intact.
- Contact support with roughly when you uploaded and which domain it was.
A scan shows failed or warning readiness checks
- Open the scan and look at the Scan health card. Each failed or warning check lists what it needs and how to fix it.
- Fix the cause it lists (credentials, DNS, permissions or connectivity), then run the scan again.
- Warnings don't stop the scan but reduce coverage. The affected checks show as Not assessed.
An upload shows Failed in the Uploads section
- Read the error on the failed entry. It's the reason the server gave.
- Select Retry to process the upload again.
- If it was rejected for quota or rate limiting, wait or free up scan capacity before you retry.
Findings show Not assessed
- Could not be collected: the scanner couldn't read the data the check needs, usually because a readiness check failed or the scan account lacks access. The Scan health card shows the cause.
- Needs a Windows scanner: the scan came from Linux and the check needs Windows-only collection. Scan from a Windows machine to assess those checks.
- The Assessment coverage card on the scan page shows how many checks were assessed and links to the Not assessed tab.
Collect diagnostic logs for support
- Run the CLI with
--debugor--verbose, or set theINSIGHTRECON_DEBUG=1environment variable, for detailed logs. - Interactive Windows runs log to
%LOCALAPPDATA%\InsightRecon\Scanner\Logs. The Windows service logs toC:\ProgramData\InsightRecon\Scanner\Logs. The portable editions log next to the executable. - Attach the log files to your support request.
The Linux scanner won't start or can't sign in to the directory
- A library load error naming libldap, libkrb5 or GSSAPI means a native package is missing. The error names the component. Install the packages in Linux prerequisites, which are also in the README in the tarball.
- Where a distribution offers both, install the MIT Kerberos SASL plugin (
libsasl2-modules-gssapi-mit). Heimdal isn't supported. - If Kerberos can't find the KDC, the host's DNS isn't resolving the domain's service records. Check with
dig +short SRV _kerberos._tcp.<your-domain>. The host's DNS has to point at a domain controller.
Someone can't see a domain or report
- Make sure they accepted the invite and signed in with the email address you invited.
- Check their organization membership and role.
- Confirm the domain belongs to the organization and has an active license.
- Have them sign out and back in after a permission change.
What to send support
- Your organization and domain name.
- The scanner version and operating system version.
- Roughly when it happened.
- The error text or a screenshot.
- What you've already tried.
Still stuck?
Send us the domain, your scanner version and what you've tried. Customers can reach support from the portal.
Not a customer yet? Talk to us or see what the scan finds.